Tracy Raiteri
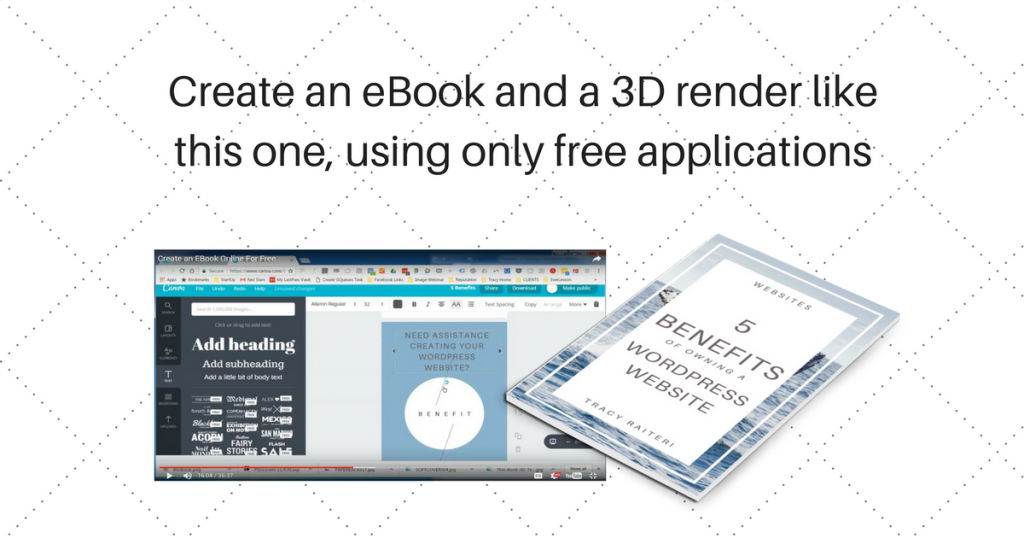
Create an EBook Online For Free

Offering your prospects an ebook that contains valuable information is a great way to grow your email list and to increase your brand awareness and credibility. But when you are just starting out it’s hard to know what tools to use to create your ebook. This training will walk you through using free applications to create your ebook and to render an image to use on your optin form.
Supporting links:
- Ebook Creator: Canva
- Image Editor: Pixlr
- eBook Render Template: bit.ly/ebookblank
Video Tutorial:
Steps:
- Sign up / Log in to Canva > Create a Design > select eBook
- Browser through the eBook templates and select on that has a flip-corner
- Add the ebook template pages to your canvas and edit
- Download the ebook as a PDF and then download Page 1 as a JPG
- Open pixlr.com and select “Image from URL” and paste in bit.ly/ebookblank
- Select LAYER > OPEN IMAGE AS LAYER and locate the JPG version of Page 1
- Click EDIT > FREE TRANSFORM and hold SHIFT while pulling the corners of the image in to make it smaller
- Click EDIT > FREE DISTORT and click and drag the image corners to align with the template corners
- Click FILE > SAVE > insert a name and select PNG > click OK
That’s it, you now have a PDF of your ebook, an image of the cover and a render of the ebook to add to your optin page (or LeadPages).
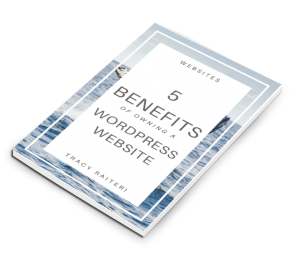
My examples created during the recording of this tutorial:
5 Benefits of Owning a WordPress Website
How to run a Facebook Timeline Sweepstake Contest

HOW TO RUN A FACEBOOK TIMELINE SWEEPSTAKE CONTEST WITHOUT BREAKING THE RULES
A Facebook Timeline Contest is a great way to increase engagement and reach of your Facebook Page and increase Page Likes and Brand Awareness. But there are some things you need to do to make your timeline contest successful and to make sure you don’t breach Facebook’s Guidelines.
I’ve run probably 30+ Facebook Timeline Contests for clients in my time, so I’ve learned a few things from trial and error. Below are the steps I have refined when running Facebook Timeline Contests for my clients a live example to inspire you.
But first here are some things to be mindful of:
- Don’t break Facebook’s Rules (https://www.facebook.com/page_guidelines.php):
- you can ask them to LIKE the contest Post
- you can ask them to COMMENT to the contest Post
- you can’t make them LIKE your Page
- you can’t make them SHARE your Page or Post
- you can’t make them leave a REVIEW
- you can’t make them TAG a friend in your Post
- You can’t change the image after you’ve published the contest post, so make sure it’s perfect before posting
- You can’t edit a post that has had Facebook Ads running, so make sure the wording and links in the post are perfect before promoting
- Optimise the image for Facebook Ads use the optimum size with not much text otherwise your ad won’t get approved (or will have very low reach)
- Prime your audience – The more activity you can stir up on your Page in the days before you run the contest the better results you will have. Try posting a few posts advising Fans that you will be running a contest soon, maybe even something like “We’re thinking about running a contest for our Facebook Fans to win xyz. What do you think?” Maybe even do a video post to tell fans of your plans.
- Make sure the prize is relevant and attractive to your target audience otherwise you’ll be attracting people that just want to win the prize and not people that could potentially be customers
- Don’t rush to promote the contest post, let natural organic activity happen before promoting to help reduce the cost of paid advertising
- Don’t run a contest for too short or too long, leave enough time to promote, but don’t drag it out. Ideally 7 days depending on the value of the prize
- What type of contest will you run? A ‘sweepstake’ contest is one where you randomly select a winner, the easiest ones to run because it’s the luck of the draw
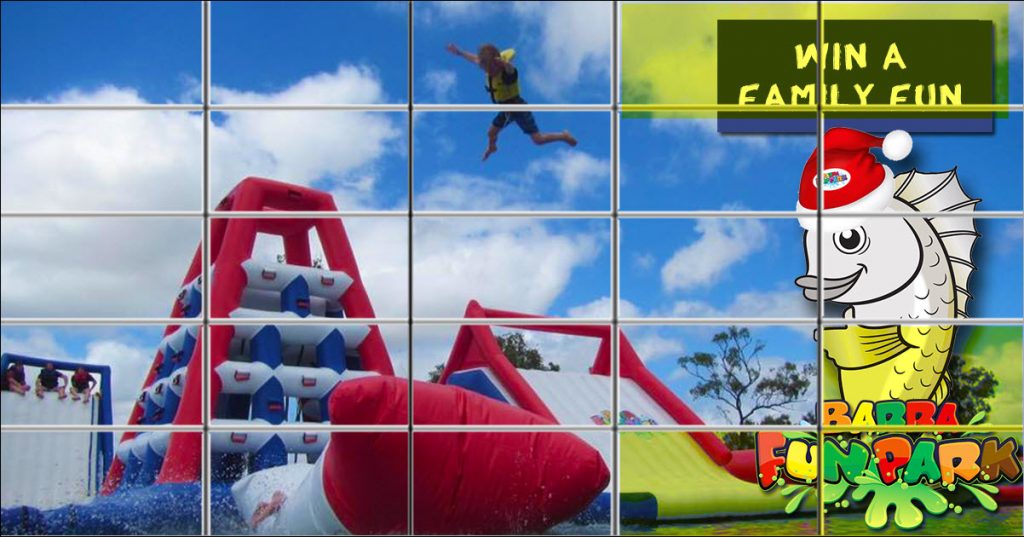
STEP 1 – IMAGE:
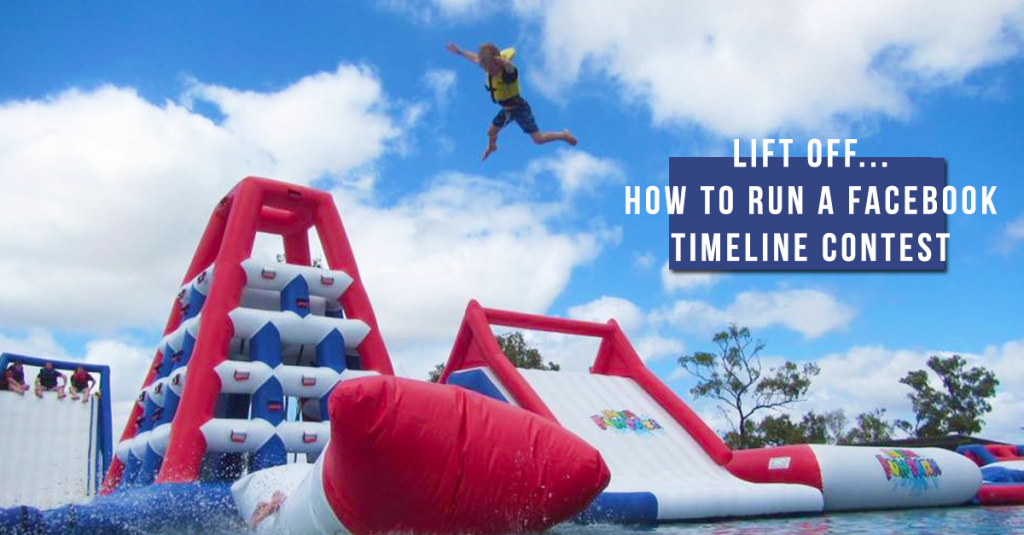
Design an eye catching image 1200px x 826px with less than 20% text (divide the image into 5×5 cells and only have text inside 5 of those cells) this will ensure it is optimised for Facebook Ads when you’re ready to run paid advertising to promote your contest. Alternatively you could create a video and use that instead of the image. A video would be great because you’ll be able to re-target people who watched the video to enter the contest or to promote other content.
Example:
STEP 2 – POST:
Draft the message you want to include in the contest post – it needs to have all the steps detailed and a link to the terms and conditions. (Don’t post this yet, it’s just a draft). Be mindful of Facebook Rules on running Timeline Contests and what you can and can’t ask them to do. (Note that you can’t edit a post that has been promoted by Facebook Ads, so make sure everything is working perfect before you run ads).
TIP: I highly recommend you ask them to LIKE and COMMENT on the contest post, and if you’re keen, ask them to use the emoticons for even better results.
Example:
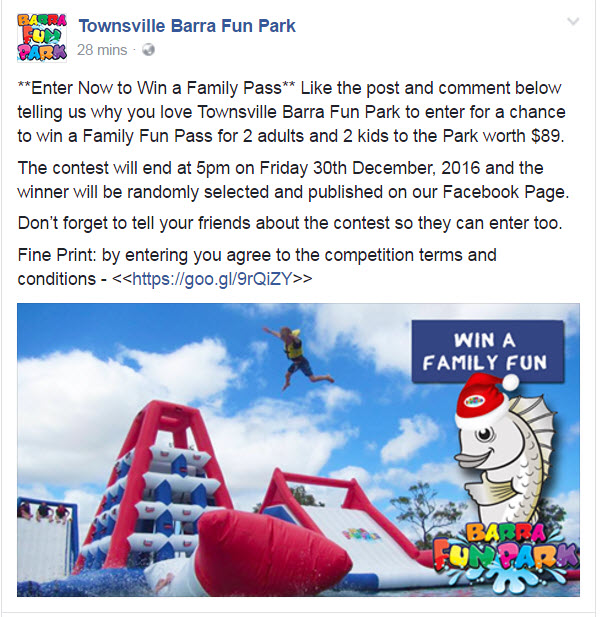
**Enter Now to Win a Family Pass** Like this Post AND Comment below to enter for a chance to win a Family Fun Pass for 2 adults and 2 kids to Townsville Barra Fun Park worth $89.
The contest will end at 5pm on Friday 30th December, 2016 and the winner will be randomly selected and published on our Facebook Page.
Don’t forget to tell your friends about the contest so they can enter too.
Fine Print: by entering you agree to the competition terms and conditions – <<insert Facebook Notes of your Terms & Conditions permalink here>>
STEP 3 – TERMS AND CONDITIONS:
Draft terms and conditions to help you control the contest and to comply with Facebook’s Rules. You can do this by creating a Facebook Note (https://www.facebook.com/help/488014787881885/) with the Timeline Contest terms and conditions or a page on your website would work too. You’ll need to create a version of your contest post image that is 851px x 315px to use as the banner of the Facebook Note.
Example:
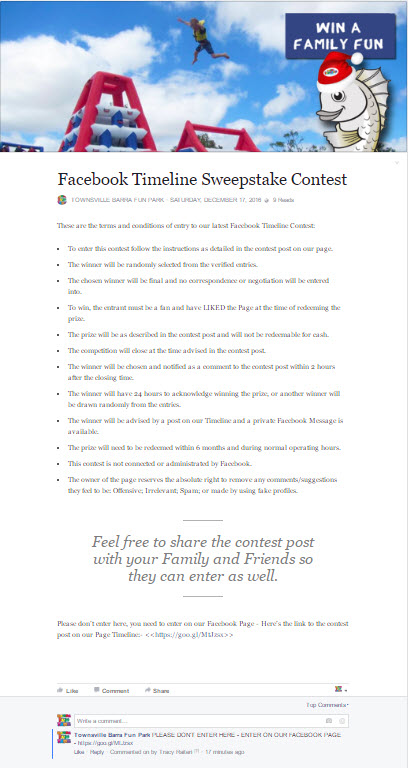
Facebook Timeline Sweepstake Contest
- To enter this contest follow the instructions as detailed in the contest post on our page.
- The winner will be randomly selected from the verified entries.
- The chosen winner will be final and no correspondence or negotiation will be entered into.
- To win, the entrant must be a fan and have LIKED the Page at the time of redeeming the prize.
- The prize will be as described in the contest post and will not be redeemable for cash.
- The competition will close at the time advised in the contest post.
- The winner will be chosen and notified as a comment to the contest post within 2 hours after the closing time.
- The winner will have 24 hours to acknowledge winning the prize, or another winner will be drawn randomly from the entries.
- The winner will be advised by a post on our Timeline and a private Facebook Message is available.
- The prize will need to be redeemed within 6 months and during normal operating hours.
- This contest is not connected or administrated by Facebook.
- The owner of the page reserves the absolute right to remove any comments/suggestions they feel to be: Offensive; Irrelevant; Spam; or made by using fake profiles.
Feel free to share the contest post with your Family and Friends so they can enter as well.
Please don’t enter here, you need to enter on our Facebook Page – Here’s the link to the contest post on our Page Timeline: <<insert Contest Post permalink here>>
STEP 4 – PUBLISHING YOUR TIMELINE CONTEST:
Now you have all the components drafted, do the following:
Publish the Facebook Note with the Terms & Conditions (it won’t have the link to the post yet)
Copy the permalink of the Facebook Note and paste into your draft post (you can use Goo.gl or Bit.ly to shorten the link and track clicks)
Copy, paste and publish the Post and the image on your Timeline
PIN the contest post to the top of your timeline so people can find it easily
Copy the permalink of the contest Post and paste in to the Terms & Conditions Facebook Note
Add a comment on the Facebook Note under the Terms & Conditions to remind people not to enter there, but to enter on the Facebook Page and include a link
Now share the post through your personal Facebook Profile (use this to test that everything is working correctly, on both desktop and mobile, ask friends to check it for you, they are more likely to tell you if something isn’t working, also the engagement will help keep the Facebook Ads costs down)
Wait until there’s some activity and social proof, and after you are certain that the text image and links are all correct
Then click ‘Boost’ next to the post on the timeline and boost it targeting just your existing Facebook Fans and their friends (leave this ad for about 24 hours before running the Ads Account ad)
Wait until there’s some more activity (again the more active a post is organically the cheaper your Facebook Ads will be)
Then log in to Facebook Ads Manager and select BOOST POST as your goal is to increase engagement on the post and select an audience (could be Custom Email Audience, Website Visitor Audience, Lookalike Audience or simply a well targeted Interest Audience if you don’t have any custom audiences to target.)
HERE’S SOME SCREENSHOTS TO HELP YOU:
Facebook Timeline Contest Post:
https://www.facebook.com/TownsvilleBarraFunPark/photos/a.177738635631441.44893.177678585637446/1305413902863903/ (click link to view)
Example Facebook Timeline Contest Post
Terms and Conditions:
https://www.facebook.com/notes/townsville-barra-fun-park/facebook-timeline-sweepstake-contest/1305415986197028 (click this link to view)
Example Facebook Contest Terms and Conditions using Facebook Notes
Screenshot of comment on Facebook Note:
To stop people posting on the actual terms and conditions page instead of the contest post, put a little message in the comments like this.

STEP 5 – COMMUNITY MANAGEMENT:
Your contest Post will take time to manage (especially if you have high engagement). Here are things to do:
- Watch your post consistently (or at least 3 times a day depending on engagement)
- LIKE every comment that is posted
- Take the time to REPLY to comments strategically, ask and answer questions, be part of the conversion
STEP 6 – THE DRAW:
Just before the contest is due to close, post in the comments that the contest is closing soon and a reminder to get entries in or to tell friends about it.
Turn off any Facebook Ads you had running.
At the time of contest close, sort comments in MOST RECENT and take a screenshot of the last few comments. This will prove as evidence if late entries complain.
Then use the app Woobox.com to draw the contest winner.
Post the winner’s name as a comment to the contest post and try and tag them. Then go and view their Facebook Profile and try and message them that they won.
STEP 7 – TRACK AND MEASURE:
Keep a record of what you do and the results of each contest you run. Over time you’ll find what works best for you and your audience, how much time and ad spend you need and what results to expect. Then the next time you run a contest you’ll have some great insights to draw from.
THIS EXAMPLE’S RESULTS:
Within 20 mins the example I used in this post reached 1,520 people, 65 Likes and 17 Shares – and that is pure organic (on a Page with 10,000 Likes), even before we shared the post or promoted it with any ads.
The end results of this example will be published soon… stay tuned.
Create and batch branded images for social media using Powerpoint

We all know how powerful images are when shared on social media, even more powerful to create them yourself and brand them with your logo and website link.
Recently there’s been an inundation of great image creation tools for both desktop and mobile: like Canva, Adobe Spark and Wordswag, but they all take time to learn and often don’t provide tools to help you speed up image creation by batching. Re-Introducing… PowerPoint, YES! PowerPoint… it’s a great tool to use to create branded images, and it’s easy to create template and brand guides so you can batch your image creation. Create a Powerpoint ‘presentation’ with 52 slides, and that will give you an image to share on social once a week for a year. Using a platform like Powerpoint, that you’re already familiar with will save you time, there’s no need to learn new tools if you don’t want to.
Firstly, open Powerpoint and resize the slide aka canvas to the image size you want – you might need to use a calculator to convent pixel sizes to cm which is what Powerpoint uses.
Then you create the slides using Powerpoint’s layers eg background image, then text and add your logo and your website address for branding. Duplicate your first ‘slide’ to use to create other images – that way you’ll save time and keep a similar layout. By duplicating the slides, you’ll be able to create loads of images fairly quickly.
Once you have a batch of images created on individual slides without the Powerpoint ‘presentation’, click SAVE AS and select either .jpg or .png, and all your slides will be saved as individual images into a folder on your harddrive ready to schedule out on your social media profiles.
Here’s my video tutorial:
You can download the PowerPoint template I used: https://townsvillesocialmediamarketing.com/wp-content/uploads/Create-and-batch-branded-images-for-social-media-using-Powerpoint.pptx
Some notes on my template, the images created look great on Facebook and Twitter, they look OK on Google+ and Instagram (but images on these platforms should ideally be deeper) but the images created on the image aren’t ideal for Pinterest, so you would probably need to create a new Powerpoint template that’s vertical in layout to create images for Pinterest.
Here’s the instructions for using my Landscape Powerpoint template:
- Create your first image on Slide 2 of this Powerpoint, brand it with your own logo and website address. (I’ve left my example there for you to use or delete)
- Duplicate your Slide 2 as many times as you want to use as templates for other images you want to batch;
- Use Slide Preview to check your image layouts;
- Then click SAVE AS and select to save either as .JPG or .PNG – this will save a folder of all the slides as individual images to a folder on your harddrive;
- Now you have a batch of branded images to share on social…
Let me know how you go and comment below if you have any questions.
Have fun creating images.
Creating social media community or terms of use guidelines

The most common barrier to entry of most businesses getting on social media is “what happens if people post content or comments we don’t like”.
I highly recommend that businesses publish a Social Media “Community” or “Terms of Use” guidelines that covers other people’s activities on your social media profiles. It isn’t a fail-safe and it won’t protect you completely from other people’s posts, but it will give you a point of reference especially when you need to delete someone’s comments or block followers completely.
1. Create simple Social Media terms of use guidelines;
2. Publish it on your website and on all your social media profiles;
3. Refer to the guidelines whenever someone comments or posts inappropriately on your social media profiles.
Example of simple social media terms of use:
The best social media community guidelines I’ve come across are the ones published by Ergon Energy on their website and on their Facebook Page, but they also include reference to the individual social media platforms’ own terms of use policies.
We also have a pretty standard Terms of Use on our own Facebook Page that you could use as a guide to creating your own version. (LIKE our page whilst your there :) )
Obviously you’d want to consult your legal advisors when putting together any organisational policies that may have legal implications, but you could use a simple one like Ergon Energy’s to get you started.
Simple example of terms of use for Facebook – publish on your Facebook About page or as a Facebook Note:
Social Media Community Guidelines or Terms of Use
To ensure everyone feels welcome, please keep in mind our guidelines:
1. Respect others – Please only publish comments and posts that are NOT offensive, obscene or hurtful.
2. Protect privacy – Please don’t share yours or other people’s personal information on our timeline.
3. Keep on topic – Please only publish comments and posts that are relevant to the topic of this page or current conversations.
We reserve the right at our sole discretion to delete any posts or comments that don’t comply with our guidelines, or which we otherwise feel are inappropriate, overly self-promotional or spammy and we will block users if required.
Content posted by our followers/fans on our page does not represent the official views of this business.
By using our Facebook page, you also agree to comply with Facebook’s terms of use, including its privacy policy: www.facebook.com/policies.
Contact us directly if you have any questions regarding these guidelines.
Thank you for visiting our page and we look forward to connecting with you!
Although publishing a terms of use won’t protect you from all events that might happen on your social media profiles, it will give you a good guideline when making decisions when moderating other people’s posts and comments, and it will give you a point of reference if you need to defend yourself against the backlash of deleting and/or banning a user.
Have you seen any good examples of social media community or terms of use guidelines? Please share them in the comments:
Add Your Own MP3 Audios to iTunes on your iPhone

Have you ever signed up for a course or online presentation, to be given downloadable audio recordings of the presentations but then never got around to listening to them because they were on your PC.
Over the years I have purchased a few online courses and summits that provided 100s downloadable audio recordings but it was just too hard to listen to them, so they end up going to waste. Really, who wants to sit in front of a computer to listen to them? I want to take them with me and listen as I walk or drive; I want them on my phone, like I would have podcasts that I listen to. I could just copy them to my iPhone as ‘songs’ but when I do that they end up getting mixed up with my music and I lose my place. Another restriction is that I can’t change the playback speed: I have become accustomed to listening to podcasts at 1.5 speed, it’s really hard now to listen to audios at regular speed, not sure that’s a good thing, but I get through more audios that way.
I discovered a way to add the mp3 recordings to my iPhone and have the option to change playback speed – I add them as audiobooks to my iTunes. There’s a bit of work to do, but here are the steps:
These instructions are only for iTunes and iPhones, sorry!
Here’s a video walkthrough version of these instructions:
Step 1: Download all the audio recordings on to your hard drive in to a new folder in your Music folder;
Step 2: Connect your iPhone to your PC and open iTunes and FILE > ADD FOLDER TO LIBRARY;
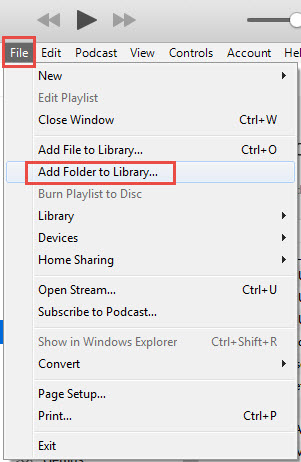
Step 3: Locate and click on the new folder containing all your recordings (this will pull in all your recordings into iTunes, but they will show as MUSIC, which we need to change.)
Step 4: In iTunes under Music view all your Songs – Hint: The folder title will become the ALBUM;
Step 5: Select all the ‘Songs’ > click on GET INFO – this will let you edit the info on all of the selected audio files at the same time > go to the tab OPTIONS and change the ‘media kind’ to AUDIOBOOK;

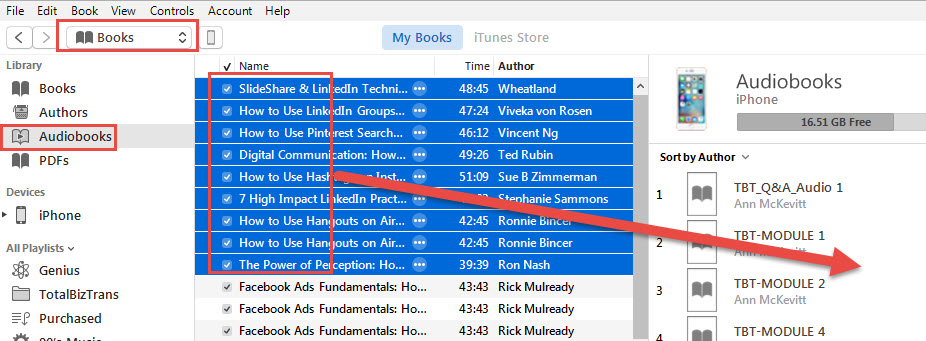
Step 6: Now in iTunes select BOOKS from the library dropdown and then click on AUDIOBOOKS – to see a list of the audios you’ve added;
Step 7: Select all the AUDIOBOOKS and drag them into the right-hand window (this is all the audiobooks already on your iphone) – now all your audio recordings will now sync with your iphone which might take some time;
Step 8: Once the audios have synced, go to your iPhone and open the iBOOK app (the default one that comes with iPhone) and you’ll find the audiobooks inside the title (which was the title of the folder you originally saved your audios into.)
Now, you’ll be able to listen to all your recordings on the go, even at double speed if you want to go crazy.
Facebook Q&A: How to turn location targeting on Facebook Posts

Question: Some times I just want a Facebook Post to show to a specific group of people on Facebook based on their location, demographic or interests. How do I do that?
Answer: It’s a great idea to use what is called “post-gating” to control the audience of your posts, especially when the content of that post is really only beneficial to one particular segment of your Facebook Page fans. Facebook is in the business of providing Facebook Users the best possible experience, and that would include serving up the most relevant content into their newsfeed.
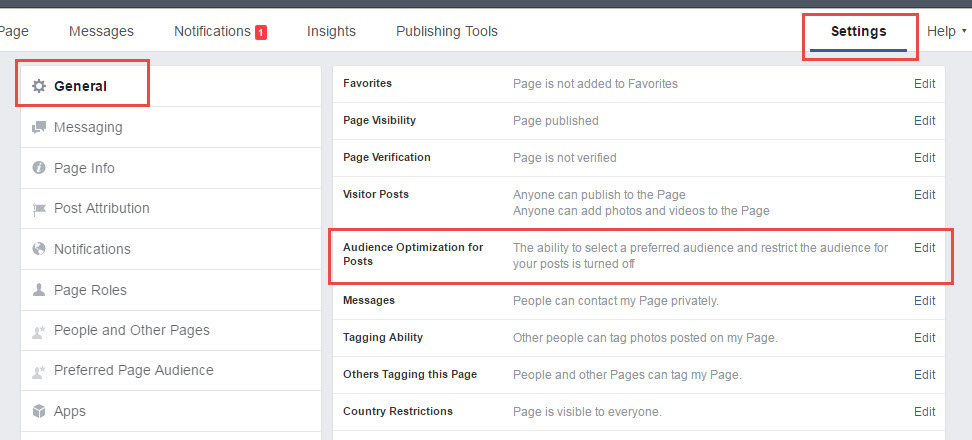
To access the post-gate settings of a post, you click on the target icon in your publisher box on your timeline. 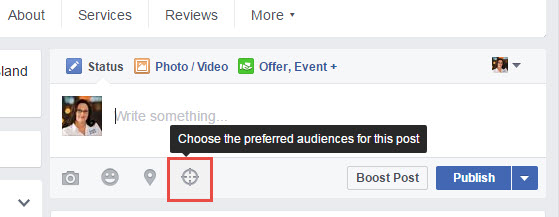
If you don’t see the targeting icon, you may need to activate the option under SETTINGS > GENERAL > AUDIENCE OPTIMIZATION FOR POSTS.
Some examples of why you’d use “post-gating” to control the audience:
Example 1: Preferred Audience
Interests based preference – an online book shop had a large shipment of books titles “How to look after your chickens?” and needed to let their fans who loved chickens know about this book, but didn’t particularly want to annoy the rest of them Facebook fans with the post, so they posted on their Facebook Page:
“Hot off the press: the latest book on caring for your chickens is now available in our online store. Order now before it sells out.”
Target – I’d prefer that only people that are interested in: keeping chickens, raising chickens, chickens as pets, Backyard Poultry Magazine see my post.

Pros/Cons: this is only telling Facebook your ‘preference’ for the reader, it will not exclude people outside this audience seeing the content.
Example 2: Audience Restrictions
Demographic restriction based – a hairdresser has a cancellation 2 hours prior to the scheduled appointment, so posts on their Facebook Page:
“Flash Sale” We’ve had a cancellation, their loss is your gain. 1 spot available this afternoon. Ring to claim and get 20% off your hair cut.
Target – Only show this post to Females aged 25 to 55 in the local area.
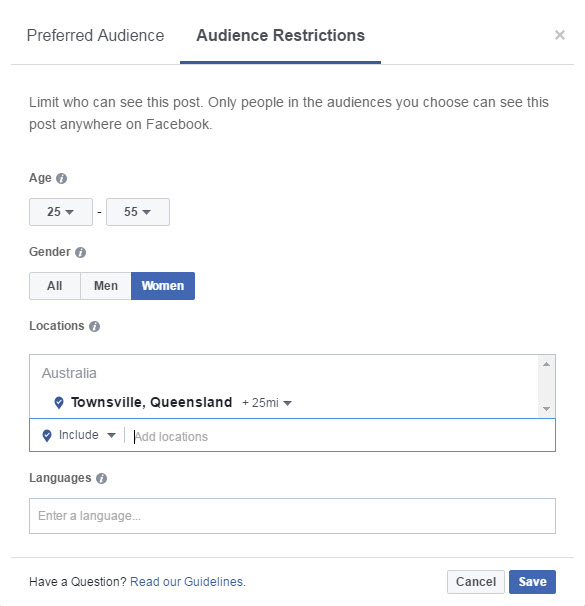
Pros/Cons: unlike “Preferred Audience”, “Audience Restrictions” will hide the post from anyone that does not match the criteria, no matter where the post is shared.
You could use each option separately, or combine them to refine the target even further.
How do you think ‘post-gating’ will help your Facebook results?
Please don’t make this one mistake on your Facebook Page

I was speaking with a hairdressing salon owner last week about how their social media marketing was going.
She said Facebook wasn’t working for them. They said they were posting every day but weren’t getting any new clients and felt like they were wasting their time. The business owner was seriously considering giving up and deleting their Facebook Page altogether.
So I went ahead and reviewed what they were posting on their Facebook Page and I immediately found the problem, most of the posts they had published on their Facebook Page were all self-promotional and trying to sell their services. Lots of “Book now” posts and lots of posts that looked like ads that a business would publish in a newspaper. No wonder no one was interested in their business on Facebook.
I explained to the business owner that people are using Facebook for personal reasons; they want to talk with their family and friends. Facebook users also love to connect with businesses when they are interested in the content that is posted. If the Facebook users is being educated, entertained or inspired they are happy to follow a business on Facebook and when they like and trust that business enough then they will buy the business’ products or services.
So we sat down and worked on a posting calendar. We set a topic for each day:
- Monday: Inspirational Quote with a stunning image
- Tuesday: Hair Tip or How to – share before and after photos
- Wednesday: Local Event – sharing another local business’ Facebook post
- Thursday: Self-promotion – promote a special deal or service
- Friday: Funny Photo – celebrate Friday by sharing a funny photo or joke
- Saturday: Testimonial – share a client’s testimonial with a photo
Notice that the posting plan helps keep the business owner focused on different topics each day, educating and entertaining before promoting.
Have you implemented a posting planner for your business’ social media content marketing?
To get you started, here’s a copy of the handy “Posting Calendar” excel spreadsheet I use.

Get Your Virtual Ticket to Social Media Marketing World 2016

It’s the last day to purchase a virtual ticket to the #SMMW16 recordings.
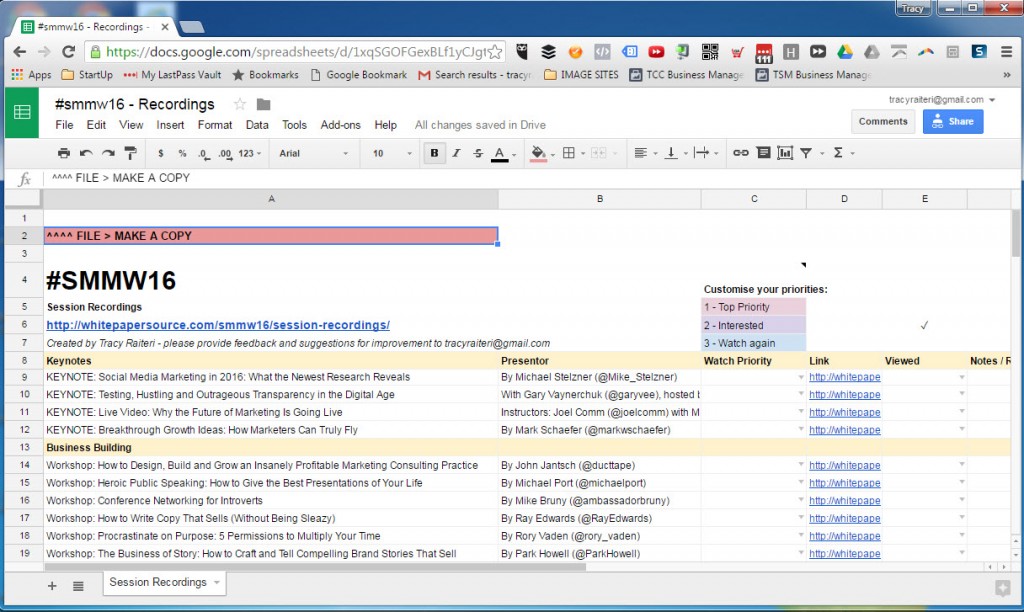
If you’ve bought your ticket, you’ll notice that there’s just so much great content with over 100 presentations and workshops available to watch. I always find that tracking which ones I have watched and have somewhere I can keep notes. So I created a Google Sheet to help me track where I’m at so I don’t miss anything.
And I thought that maybe others might benefit from it, so I’m sharing :)
Just sign in to your Google Drive and click on the link below and <Make a Copy>
Link to “#smmw16 – Recording Tracker” Google Sheet
You’ll need to be signed in to the SMMW16 dashboard with the details you would have received when you purchased your virtual ticket.
Let me know if this sheet has been helpful.
Can’t see who has liked my Facebook Page anymore

I’ve received a number of cries for help from readers about the latest changes by Facebook, and the latest being that we can no longer view a list of people who have liked our page.
But don’t panic… Facebook just moved it without telling us… ’cause that’s how they roll :)
Here’s the workaround:
To see the list of people that LIKE your Page
View the Page Timeline
- Click on SETTINGS
- Click on PEOPLE AND OTHER PAGES
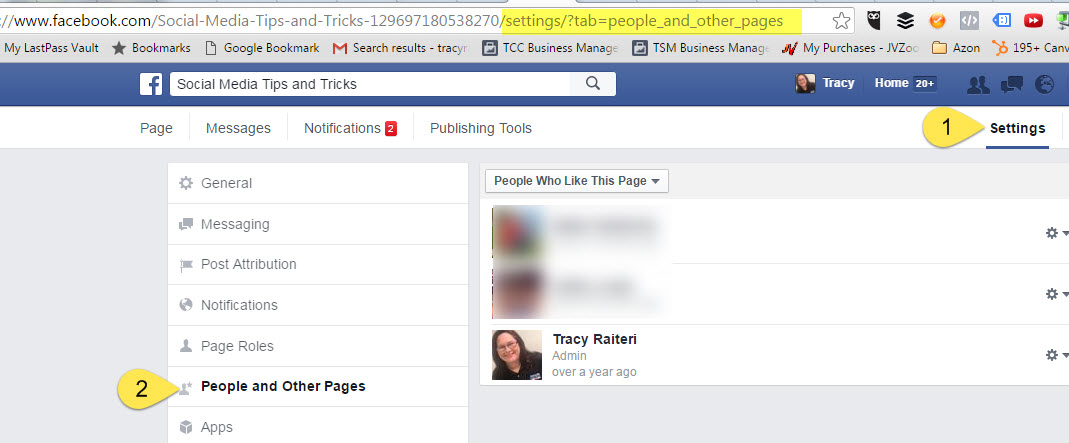
Or a quick and easy way to get there is by adding this text to your Page URL: “settings/?tab=people_and_other_pages“
Example: https://www.facebook.com/TownsvilleSocialMediaMarketing/settings/?tab=people_and_other_pages
Have you come across any issues with Facebook Pages recently?
Woocommerce Variation/Attribution don’t display correctly

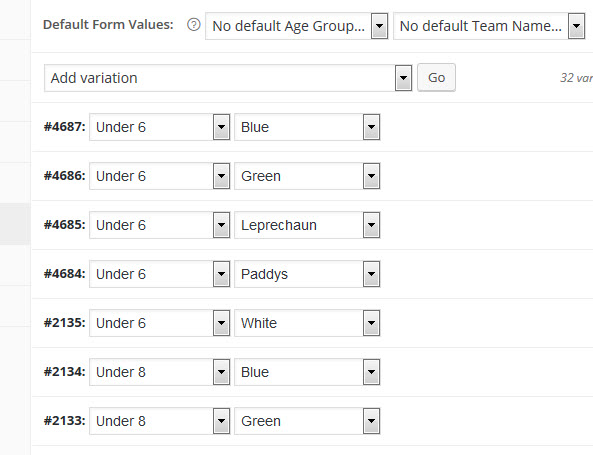
I’ve just been working on a website that has two attributions and a lot of product variations, over 30 for each product. I discovered that at a point, actually once I went over 30 variations, the frontend stopped displaying the variation attributions correctly, and was displaying every attribution available to that product, not just the one related to that first level attribution. OK, I’ve probably lost you, but if you’re having this problem, you will know.
Basically this was the Woocommce > Product > Variations:
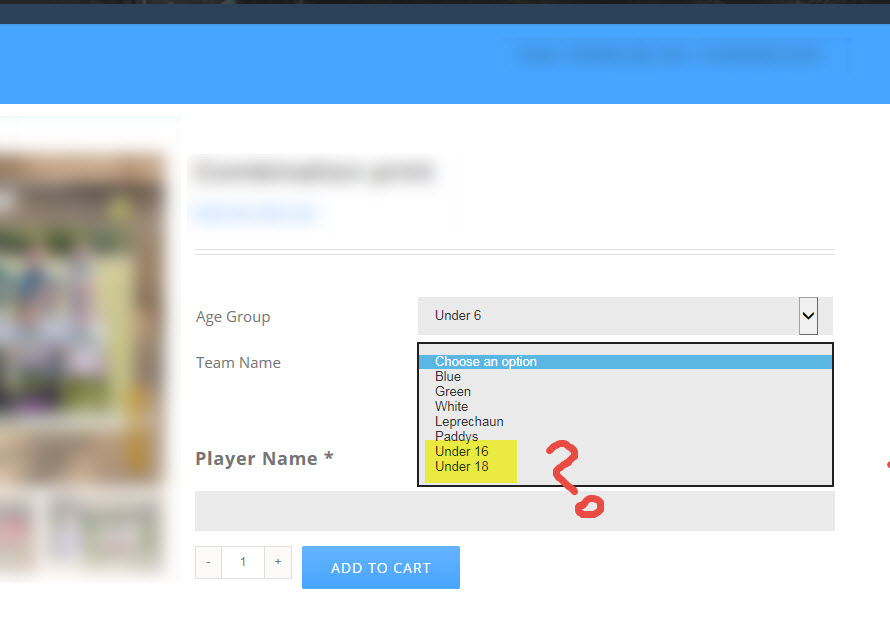
But this is what displayed in the frontend – every one of the available attributions instead of just the ones available to the first level attribution:
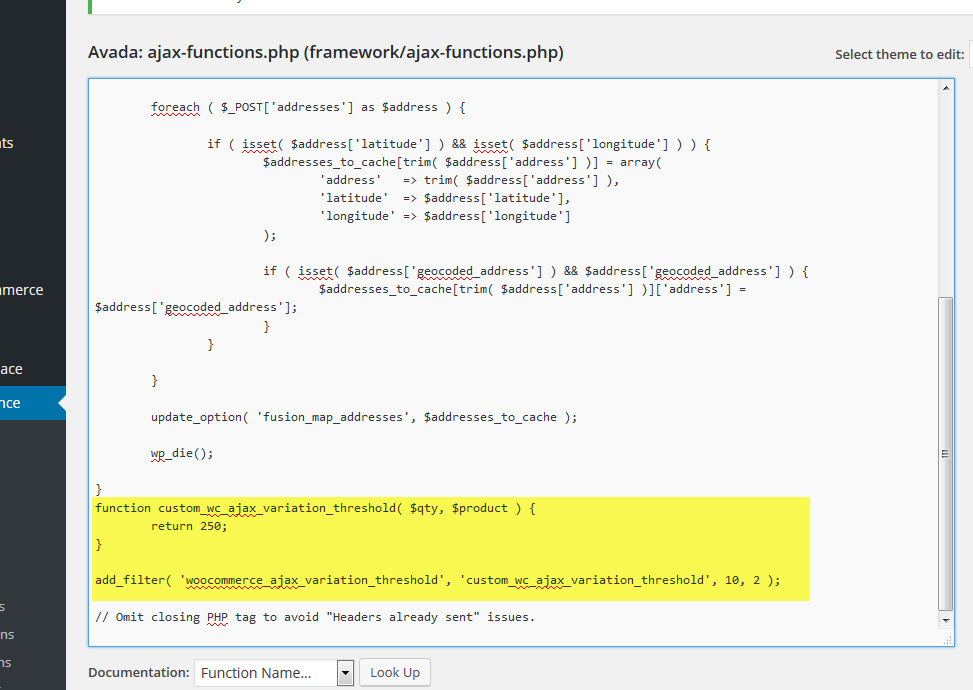
I dived into Google to look for a solution and came across a helpful post in the WordPress.org forum
So I added the suggest code to the end of the code in the theme’s ajax.functions.php file (they said to add to functions.php but adding it here worded for the theme I used on this website.)
I’m publishing this article so it may help others find a solution, and also a reminder to me if it happens again, I suspect when we update the theme in the future.
.