Tracy Raiteri
YouTube Channel Art changes from 5th June 2013
Many people in the social media arena and many businesses are in a bit of a frenzy with the looming ‘imposed’ design changes that Google are making to the YouTube Channel layout. The reason behind the changes by Google/YouTube is that the channels will now be suitable for viewing on multiple devices.
Create your new YouTube Channel banner image
As a social media manager, we will no longer have the option for a full background image for our clients, but will only have a banner that we can brand. This banner will be viewed differently on different devices and we need to work out where the most valuable real estate is on the channel.
Google instructions are at http://support.google.com/youtube/bin/answer.py?hl=en&answer=2972003 but to make it easier and quicker to create the new YouTube channel art, I have created a photoshop .psd (Download) that you can use as a template, or if you’re not a photoshop user, I’ve also included an image (Donwload) that you can use as a template (just ‘edit’ the image and overlay your own images, then delete the template). (Be warned, this is a ‘big arse’ image at 2560 X 1440 pixels.)
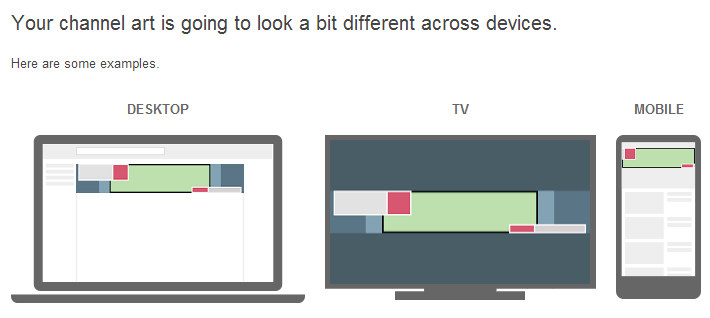
The green area in the middle of the image is the safe area that will be visible on all devices and platforms;
The red areas are where the YouTube profile picture image will sit when the browser is at it’s minimum; the other red area is where the social links will sit; Don’t include important information in these areas as they will be covered over;
The light grey areas denote where the profile picture image and the social links will extend to when the browser is extended; Don’t include important information in these areas as they may be covered over;
The other areas coloured are for different devices. The largest background is for TV and the middle strip is denoting the maximum extension on a desktop device, and the smaller inside strip is the maximum display on a tablet. But if you concentrate on the most important area which is the green area in my image. To view a working display of this image uploaded to a YouTube Channel visit my personal YouTube Channel at https://www.youtube.com/tmrait

Once you’ve uploaded your new YouTube Channel banner, post a link below so we can check out your handy work.
Let me know if you have any problems.
HTML code to use in Facebook Notes
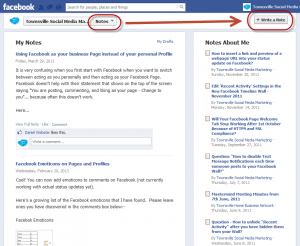
Sometimes I want to create a Facebook Page post that’s informative, but the problem is when I want to link to that information again it’s hard to find, lost amongst all my other Page posts. Introducing Facebook Notes. Facebook Notes are a great way to create larger posts and have them stored somewhere that’s easy to find and link to later on. They are excellent for ‘How tos’ and other informative posts that your Fans will benefit from over time.
In their basic form, Facebook Notes are just text and images, but you can use basic HTML code to spruce them up. Here are some HTML codes that you can use when creating your Facebook Notes:-
HTML Text Tags for use in Facebook Notes
- <b>Bold Text</b>
- <i>Italic Text</i>
- <u>Underline Text</u>
- <s>Strike out text</s>
- <big>Big Text</big>
- <small>Small Text</small>
- <h1>Heading 1</h1>
- <h2>Heading 2</h2>
- <h3>Heading 3</h3>
- <tt>Creates teletype, or typewriter-style text</tt>
- <a href=”http://yourwebsiteURL.com”>Creates a hyperlink</a>
- <a href=”mailto:[email protected]”>Creates a mailto link</a>
- <p>Creates a new paragraph</p>
- <blockquote>Block quote Indents text from both sides</blockquote>
- Unordered List
<ul>
<li>Bulleted List one</li>
<li>Another one</li>
</ul>
- Ordered List
<ol>
<li>Numbered List one</li>
<li>Number 2</li>
</ol>
Feel free to post a link to your Facebook Notes in the comments below.
How to create custom icons for Social Media Widget
Do you want to customise your “Follow Us” icons that are displayed on your WordPress website? It’s a little tricky, but here’s the steps we took to create our own custom social media widget icons.
Custom Icons for WordPress plugin Social Media Widget
Uploading your custom Social Media Widget icons
1. Login to FTP
2. Create a directory called “icons” in the /public_html/ yourwebsiteurl.com/wp-content/ directory on the webhost.
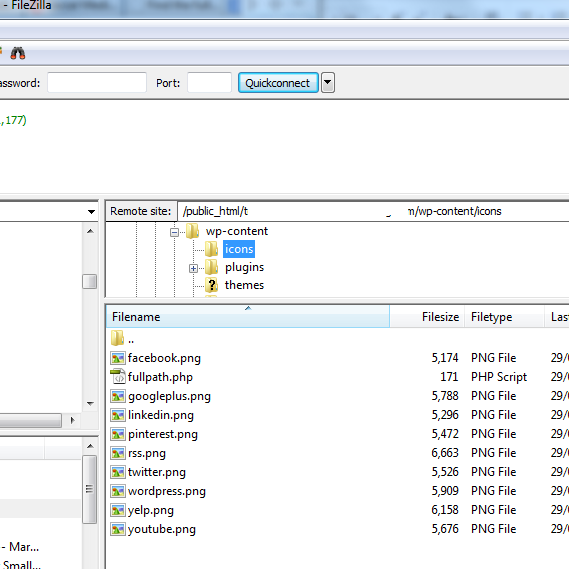
3. Create images and make sure you save them with exactly the same file name as the images in /public_html/ yourwebsiteurl.com/wp-content/plugins/social-media-widget/images/default
Images must be saved in the same file protocol as the original default icons, here’s a list, but this might change with updates of the plugin.
eg facebook.png; pinterest.png; twitter.png; yelp.png; youtube.png
4. Upload the new images into the “icons” directory you created on the web host.
Find out the full path to your new directory
For this plugin you need to know the full path to the directory that contains your custom icons. To do this create a NOTEPAD document and save it as “fullpath.php” with this code in it, then upload this file into the folder on your web host called “icons”.
<?php
$dir = dirname(__FILE__);
echo “<p>Full path to this dir: ” . $dir . “</p>”;
echo “<p>Full path to a .htpasswd file in this dir: ” . $dir . “/.htpasswd” . “</p>”;
?>
Now you have a directory called “icons” with all your custom images and the “fullpath.php” file.
Now visit the URL:-
http:// yourwebsiteurl.com/wp-content/icons/ and click on the “fullpath.php” link
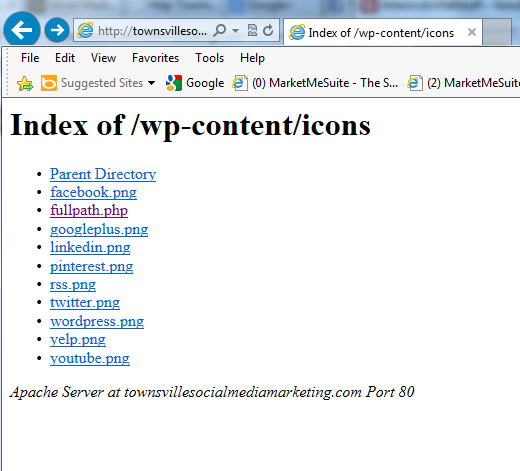
This will display the full path for this directory:-
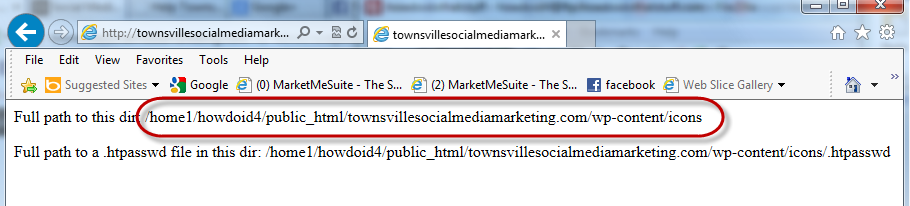
Once you have this path, you can delete this “fullpath.php” file from your web host for security reasons.
Install and customise the Social Media Widget WordPress Pluging
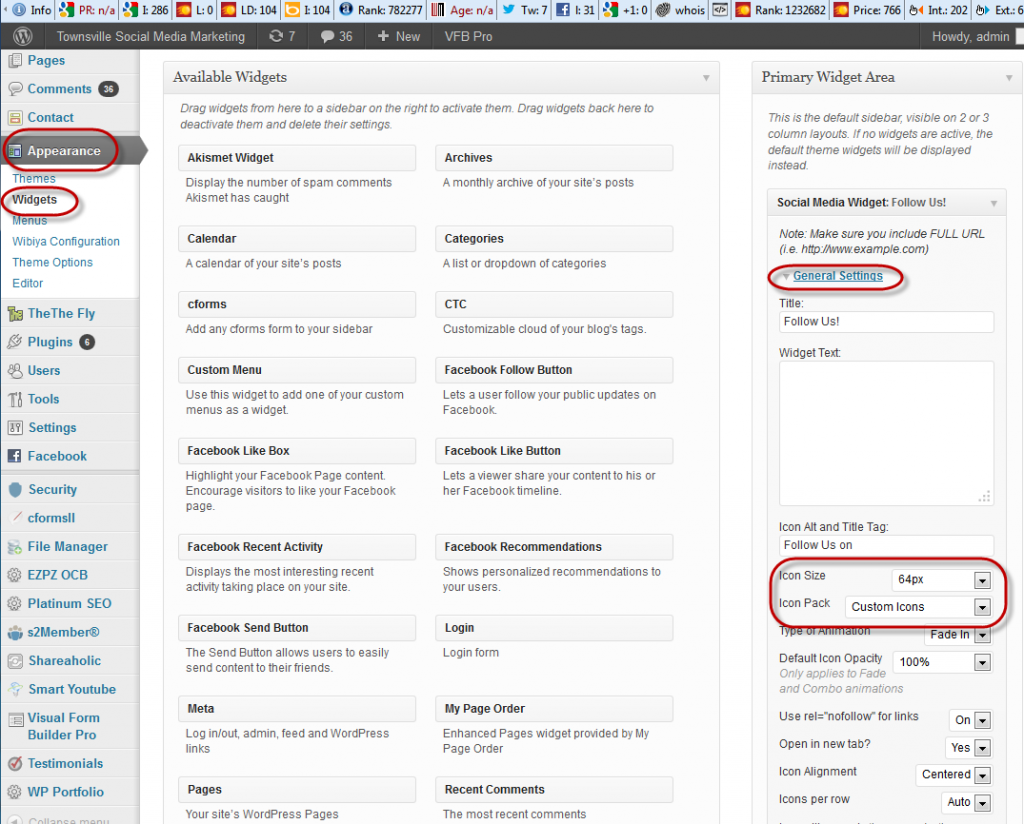
1. Now login to your wp-admin > plugins > add a plugin and find and install the “Social Media Widget” plugin.
2. Next go to Appearance > Widgets and drag the “Social Media Widget” into the widget area. Under General Settings change the “Icon Pack” to “Custom Icons”.
3. Under the following tabs eg “Social Networking”, “Images and Video” etc insert the links to your social media profiles.
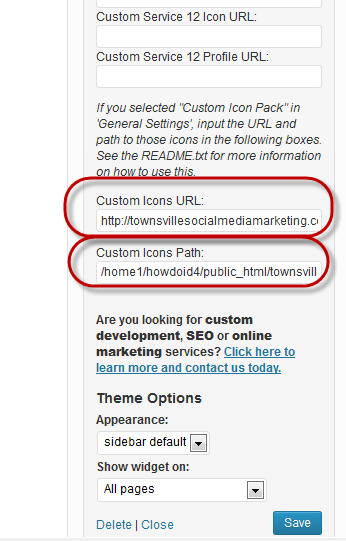
4. Under “Custom Services” insert the Custom Icons URL to the folder containing your custom icons and also insert the Custom Icons Path to the directory that contains the custom icons.
The Custom Icons URL is basically the web address for the folder your custom icons are in, that is the folder you created above called “icons”. It will look something like:- http://yourwebsiteurl.com/wp-content/icons/
The Custom Icons Path is the path you get above from adding the “fullpath.php” file to the directory where you icons are. It will look something like:- /yourhomeid/yourcpanelid/public_html/yourwebsiteurl.com/wp-content/icons/
Test that the custom icons work
View your website and test that all the links to your social media profiles work.
LinkedIn: How to remove a network connection or contact (2013)
I have had a few LinkedIn Professional Profiles request a connection on LinkedIn only to turn out to be obviously fake and begin spamming me with some $13million dollar deal.
This guy was sending me weird emails, so I wanted to remove him from my network:-
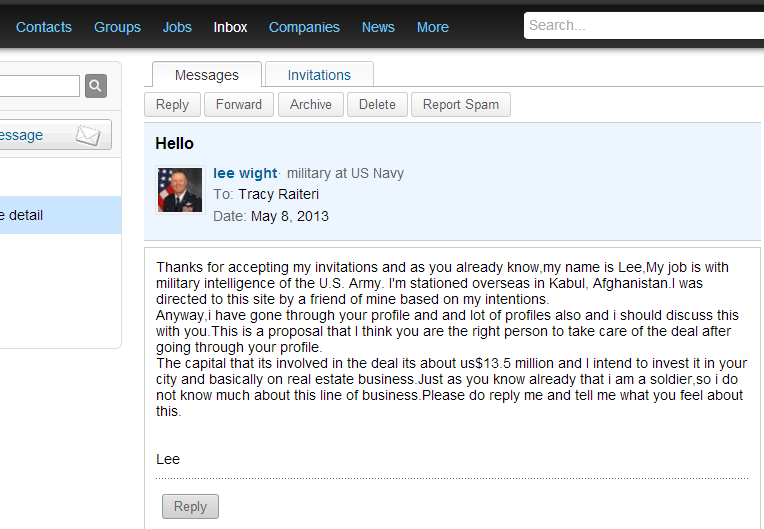
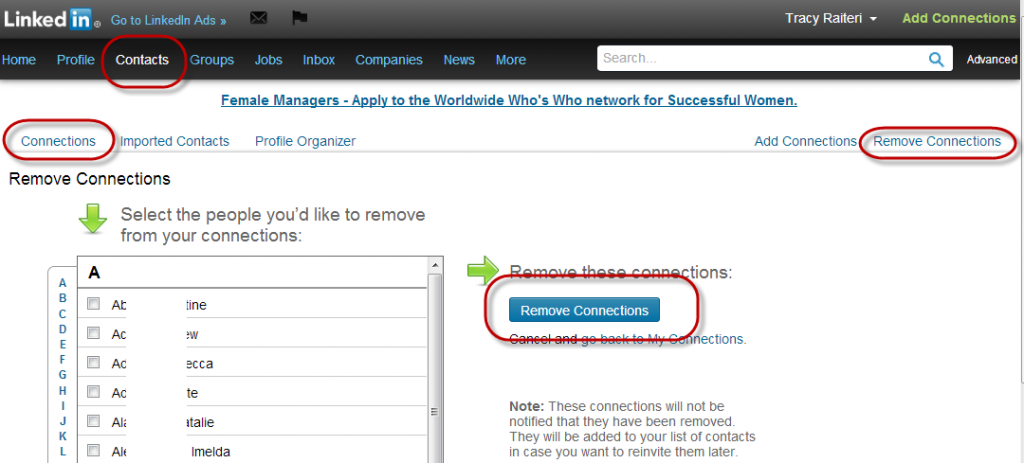
Here’s how to “un-connect” or remove a contact from your LinkedIn network:-
1. Click on the “CONTACTS” in the top menu.
2. Click “CONNECTIONS”;
3. Click “REMOVE CONNECTIONS”;
4. Locate the connection you want to remove and tick the box;
5. Click “REMOVE CONNECTIONS”;
6. Voila! The person is removed.
The person you removed is not notified and no message is sent to them. Obviously they will find out if they try to contact you that you’re no longer connected.
Watch me do it:-
VIDEO
9 Tips to Effectively Marketing with Social Media
Unless you’ve been living under a rock, you’ve heard many marketing experts recommend small businesses use social media as part of their marketing strategy. The Internet is swamped with articles on using Facebook, Twitter, LinkedIn, YouTube and something called Pinterest, and a heap of other sites, to help promote your brand, products and services. For most small business owners, however, all this information is just causing a problem of overwhelm, and in some cases, just forces the small business owner to do nothing.
Social Media is JUST a TOOL
Keep in mind when using social media to promote your products and services is that it is just a tool. The key question for any business is “What do I want to achieve from marketing on social media?”
Marketing on Social Media… is exactly that, utilising a digital tool called social media to reach your target market and influence them to do business with you. Where marketing on tools like TV, Radio and Print, is mostly a one-way dialogue with your business talking at groups of people that contain a percentage of your target market, marketing on social media is an open dialogue where you attract and converse with your target market, create and build relationships and influence them into doing business.
Here are my 9 Tips to Effectively Marketing with Social Media:-
1. Be where your target market is and not where you are comfortable. If your target market are professionals, then you need to be on LinkedIn, where you like it or not.
2. Keep one eye on what your competitors’ are doing on social media. It makes good business sense to check out what is working, and what isn’t working for others in your industry. No point in you making the same mistakes.
3. Engage and interact with your target market. This builds credibility, relationships and a community, and we all know that “people do business with people (not logos) that they know, like and trust”.
4. Always provide value that is worthy of your target market’s time. Only create and share content that is congruent with your products and services and that builds on a reason why someone would want to do business with you. Every time you post ask yourself “what is it that I want my prospect to do once they have this information?”
5. Integration. As mentioned, social media is a tool, and it doesn’t replace TV, Radio or Print (Shock, horror, I bet you never thought I would say that…) What you should learn to do is integrate all of these marketing tools to get the best results. Use TV, Radio and Print to reach out to your target market and grab their attention, then drive them to social media where you get to build on relationships and prove your credibility building trust and influencing them to do business. Can you see how powerful this could be?
6. Humanise your brand. It’s all well and good to have a great looking logo and brand image, but really, if you think about it, people don’t care about that stuff. It’s been documented that purchases are based on emotion, and one way to stimulate that emotion with your target market on social media is to create a reality around your brand, this requires authenticity, transparency and openness. Converse with your prospects on social media like you would if they walked into your store, look them in the eye, talk about the weather, answer their questions, solve their problems, this builds emotional relationships more than a glossy logo or Facebook cover image.
7. Get OUT! on social media. If you only post in your own little circle you’ll only ever really reach the people that already know you and your products. Venture out into other communities where your target market hangs out and start building a relationship with those other non-directly-competing businesses. Maybe even work on ‘cross’ venture marketing, where you share their content with your followers, in exchange for them sharing your content with their followers. It’s a win-win.
8. Test and measure. “You can only manage what you can measure” so keeping good stats on what is working and what isn’t working is important to get the best results from your time (and it’s a lot of time) and effort.
9. In the end, social media might be cheap, but it isn’t free. Your time is valuable, you can spend your time learning how to leverage social media or you can hire someone that has already done the learning (like us), so you can get back to ‘making money’.
Adding Images to Facebook Page Events (March 2013)
Facebook have recently changed the Events platform, and I’ve noticed now you don’t have an option to include an image when you create Events as your Facebook business Page. But I worked out a word-around :)
- Create a banner using the image or .PSD template as a guide (click to download the image or the .PSD);
- Login to your personal Profile and ‘switch’ to admin your Facebook Page then create the Event;
- Switch back to your personal FB Profile and click on the event in your news feed or your Events menu in your Home menu;
- Click on “Edit Event”;
- Click on “Add Event Photo” and upload the banner you created at step 1. above;
- When you’re happy, click “Save Changes” and got back to your Facebook Page and see what it looks like.
PS If you’re impressed, post a link to your event here so we can check out your handy work :)
IMAGE TEMPLATE – not to scale, about 70% reduced. Click on the image to view full size, right mouse click and “Save Image” to save a copy of the image to your harddrive or click here to download the .PSD version:-

15 Best practice tips when designing a blog site
Recently, I have had a client ask me what the best tips were for designing a blog site for their business. So I thought I post my reply here… Best practices tips when designing a blog site:- 1. Have a goal for your visitors and make sure it’s easy for them to navigate to what they are looking for. . 2. Don’t overwhelm them with information or options, get to the point. See point 1. . 3. Humanise your blog… people WANT to know how the people are behind your blog. . 4. Fancy doesn’t mean successful: a plain site is often more effective. . 5. Make your blog ‘sticky’: create content that engages so prospects will stay on your site longer and more likely to return. . 6. Setup Google Authorship: take credit and build your reputation by installing Google’s authorship code into each blog post. . 7. Lead capture form: all businesses should be building a database of prospects, give something away in exchange for lead information. . 8. Include a Sitemap: this helps visitors and search engine navigate through your blog. . 9. Add a Privacy Policy: let your visitors know that you will protect their information. . 10. Social sharing buttons: make it easy for visitors to share you content far and wide. . 11. Social follow buttons: encourage visitors to link with you using their favourite social media profile. . 12. Mobile-friendly: design your blog so that it looks good on both PCs and smartphones. . 13. Contact Us: include a map, contact details and a contact form to make it easy for visitors to contact you or to local your business. . 14. Use WORDPRESS.ORG…. (sorry, just that I love WordPress and so do search engines, so why not make it easy and give them what they want…) . 15. Lock it down: hacking is a huge problem these days, so you should install tough security features and ensure backups are done regularly. . Can you think of any other points that should be included when developing your blog site? 
How to add yourself to a Twitter List you created
When you create Twitter Lists and allow others to subscribe to that list, there’s a problem… you can’t actually add yourself to that list using Twitter.
For instance, we created a Twitter List called “Townsville Businesses” and we want to add other Townsville businesses Twitter Profile to that list so we can filter on tweets from only Townsville businesses that we follow. This cuts down the noise and lets us focus on adding value to Townsville businesses, who are our primary target market. We LOVE Townsville…
Anyway, we also want other people to “Subscribe” to that list so they too can get to see the tweets from Townsville businesses. Problem is Twitter won’t let you add yourself to a list you have created, which is sad as you want your tweets to display in the list…. BUT there is a work around and here it is…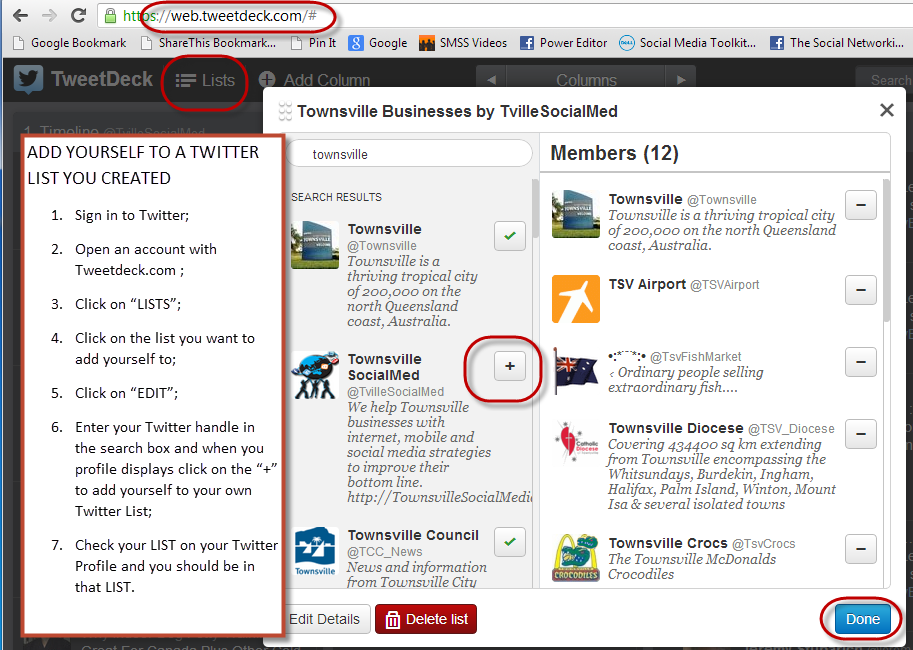
- Sign in to Twitter;
- In a separate browser window, go to Tweetdeck.com and sign up for a free account;
- Click on “LISTS”;
- Click on the list you want to add yourself to;
- Click on “EDIT”;
- Enter your Twitter handle in the search box and when you profile displays click on the “+” to add yourself to your own Twitter List;
- Check your LIST on your Twitter Profile and you should be in that LIST.
Did this help you? Could you pay us for our time with a +1 or a social share, we’d really appreciate it…
If you’re a Townsville business, when you ever need any help with your social media, don’t hesitate to call your local social media specialists… us :)
To subscribe to the list in this video – https://twitter.com/TvilleSocialMed/townsville-businesses
Watch me do it –
How to message all your LinkedIn Connections
Ways to message your connections on LinkedIn
There’s two ways to get a message out to all your connections at the same on LinkedIn.
Option 1 – “SHARE AN UPDATE” TO YOUR LINKEDIN CONNECTIONS
You can send a status update to your connections via their LinkedIn news feed and limit it to only your Connections:-
1. From your HOME screen, insert the text you want to send out and then select only “Connections”;
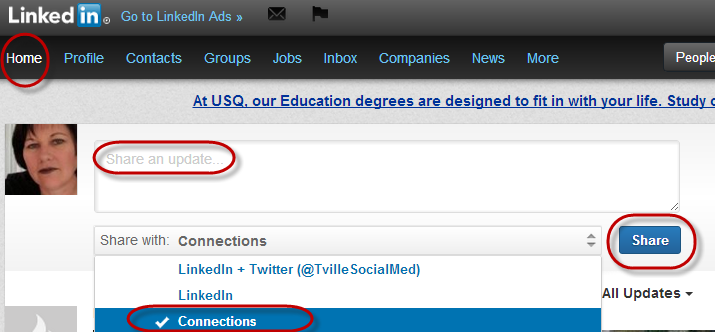
But your Connections may miss your message, an alternative is to send each of them a LinkedIn mail message:-
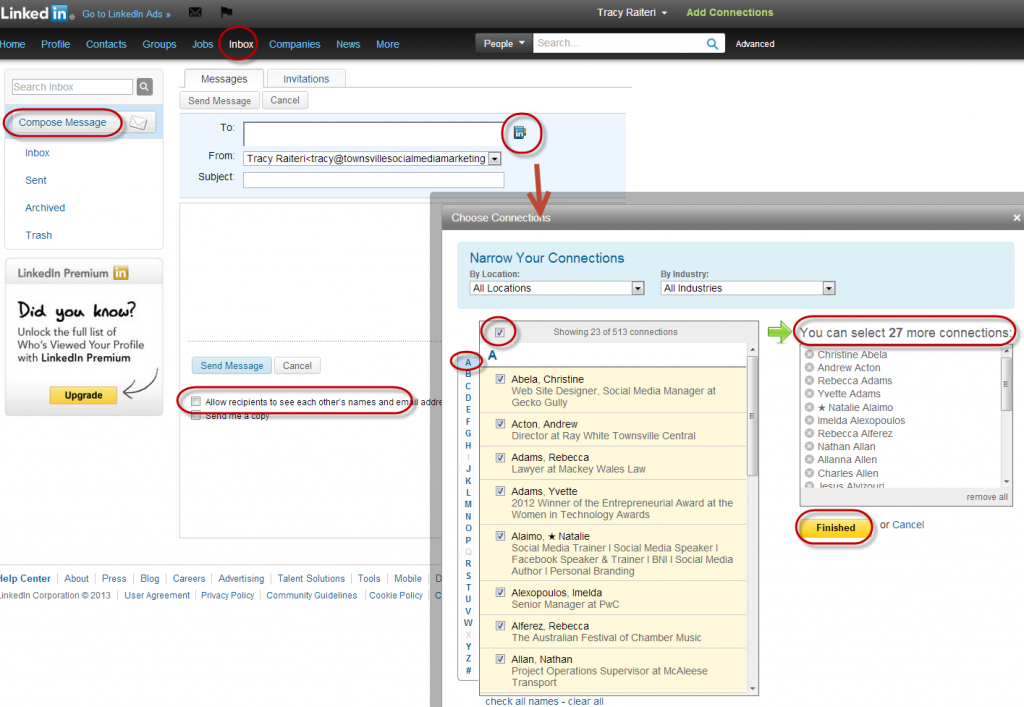
Option 2 – SEND BULK MAIL TO YOUR LINKEDIN CONTACTS
You can send mail to your connections via your LinkedIn Mail address book, but on the free version of LinkedIn this has a limit of 50 recipients per message. Here’s how you do it:-
1. Go to “Inbox” > “Compose Message”,
2. UNTICK “Allow recipients to see each other’s names – THIS IS VERY IMPORTANT;
3. Click on the address book icon next to the “TO” field;
4. Click on “A” > Select ALL by clicking in the box at the top; Click on “B” > Select ALL; etc until you’ve selected less than 50 contacts; Click “Finished”.
5. Add the text and click “Send Message”;
6. Then go back and do the next letters in the alphabet…
Social Media and Digital Marketing Training Townsville
Are you a small Townsville business struggling with marketing your business online?
Here’s a training package that will give you an understanding of everything you need to know to get your business online and effectively using the web and social media to market your business… and you could even get a subsidy from the Queensland Government.
“Get Up To Speed” program is a 12-week flexible training course delivered online and suitable for any sized business and any level of technical experience, as long as you can use a computer.
Topics taught include using social media to market your business, tips on designing a website, what is search engine optimisation, how to setup a pay per click advertising campaign, how to advertise online, all about emarketing and loads more. The topics are delivered by online self-paced course material and via live webinars (online seminars).
The Get Up To Speed program is funded by Skills Queensland; presented by BroadbandToday.com.au and has been developed and delivered by The Creative Collective and support is provided by local volunteer mentors like me.
The program is available at $595 with a $300 subsidy provided to Queensland based residents due to a Government subsidy (so Townsvillians only pay $295).
If you need more info visit Get Up To Speed, or would like to speak to locals that have completed the program, post questions and comments below or email [email protected]. PS Share this with your business friends that are struggling with online marketing.

VIDEO