Setup A Webhost, Add A Domain And Install WordPress
Have you ever wanted to create your own websites without having to pay a web designer each time. It’s easy, we’ll show you how.
Signup With a Website Host Provider
Find a web host and sign up with them. This could take up to 72 hours to activate. They will send you an email with all the details you need. Make sure you keep this in a safe place. In most cases, the webhost will give you a free domain with your webhosting.
WHAT WE DO: We use justhost.com.au and have purchased an unlimited account. This means we can have unlimited number of websites hosted on our web server. They also gave us one free domain name.
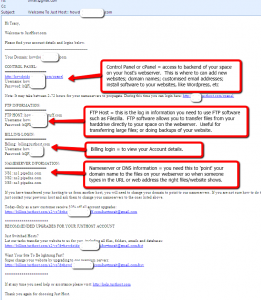
Host Email Information
Adding New Domain Names
You can purchase more domain names and if you have enough space on your web server, you can ‘host’ the websites all on the same web server.
FOR THIS EXAMPLE: We wanted to create a website called www.aussie90daychallenge.com so purchased the domain name from crazydomains.com.au.
When you purchase a domain name with a domain registrar they will send you an email with your Member Account details. Keep this safe. You will need this information to login to change the nameservers eg point the domain name to the website files you have hosted on your webserver.
HINT: Try and stick with the same domain name registrar to make it easy to keep track of domain names.
To Add The New Domain Name To Your Existing Web Host
FOR THIS EXAMPLE: We wanted to ‘host’ the new aussie90daychallenge.com website on our justhost.com.au server.
We have to setup our new domain name so it knows where to find the website files (DNS or Name Server settings) and we need to tell our web host that we want to host a new domain name’s website files (Addon Domain).
If you purchase the new domain name for your web host provider, then you may not have to do the following configurations.
Step 1 – Set DNS or Name Server with Domain Registrar
Login to your domain registrar (in this example www.crazydomains.com.au); Manage Domains; Click on the domain you want to edit; select “Update Name Servers”, and change to correspond to the information provided by the webhost in their initial email.
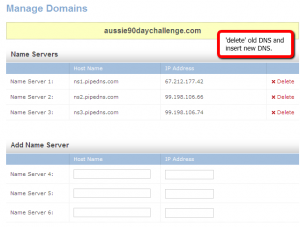
EXAMPLE: We purchased aussie90daychallenge.com from crazydomains.com.au, but the WordPress blog we created is being hosted by justhost.com.au. We need to change the setting on our domain name so it knows where to get the website from to display when someone goes to the website. In this case, we need to set the DNS or Nameservers for aussie90daychallenge.com to show the Nameservers of Justhost which we get from their original email, which are:
NAMESERVER INFORMATION:
NS1: ns1.pipedns.com
NS2: ns2.pipedns.com
NS3: ns3.pipedns.com
Step 2 – Add on the new domain to your web host via cPanel
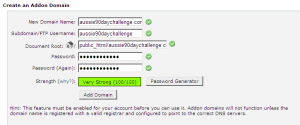
Login to your web server cPanel > Add on Domains > add your new domain name.
Install WordPress On Your New Domain
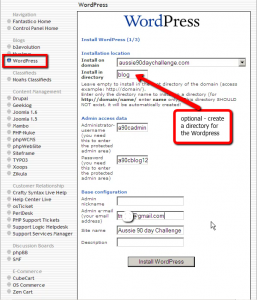
Log in to cPanel > click on Fantastico > WordPress > New Installation > Select domain from dropdown > if you want the WordPress in a directory of this domain (eg aussie90daychallenge.com/blob) > insert an admin username and password that you want to use to login to the dashboard of your WordPress website > change the admin email to your email address > change the site name (this can be changed later) > click Install WordPress > Finish Installation > insert an email address to send a copy of the WordPress installation details to.
Keep a note of the username and password.
You might need to wait a few hours before the DNS and the WordPress installation are working, so don’t worry if you can’t login to the new website straight away.
You should receive your email with all the login details. Keep this email in a safe place. Use these details to login to the dashboard of your WordPress installation to start customising on your WordPress blog.
Watch our Video Tutorial:-

Leave a Reply