Tracy Raiteri
6 Social Media Trends You Shouldn’t Ignore in 2016
This topic – social media trends for 2016 – has set a lot of marketers, analysts and other stakeholders writing about scenarios for weeks. Some trends are already emerging and are expected to get stronger this year. Other predictions are still dormant, but considering the past evolution of social media platforms, these are very likely to storm onto the social media scene.

So, what trends will most likely rule the year 2016?
An Increased Concern over Online Privacy and Safety
The online world is not a safe place. The fact that we are not physically there does not protect us from harm. As individuals, identities can be stolen. As businesses, reputations can be destroyed.
Social media platform owners and administrators will take security more and more seriously in the coming year. Security certificates will be harder to counterfeit and account security will be stepped up with two or even three-step verification procedures. Real identities and sensitive information will be protected by more sophisticated encryption procedures and, overall, we will all be safer in the online world knowing that we have more control over what we share and with whom.
The Average Facebook User Age Will Grow
There is an ongoing trend already – teenagers and young people migrate towards other social media platforms, such as Instagram or Snapchat – while Facebook remains the king of social content sharing among a more mature audience. This makes it a perfect platform for businesses to reach potential customers, not just in the B2C sector, but also in the B2B sector.
This means that Facebook advertising, especially for B2B businesses, will be more relevant, more targeted and most importantly, more effective.
Social Media Will Become More Interactive
There was a song about video killing the radio star; well I predict live streaming will kill the static post. Social media live broadcast opportunities will put an end to static, one-way content sharing promotional strategies. It is no longer enough to share a link or a photo. People want real engagement; they want human touch from the businesses they follow, by talking directly to businesses in live casting sessions. I predict that live interactive streaming via platforms like Meekat, Periscope, Blab, YouTube Live and Facebook Live will become a popular and effective way for businesses of all sizes to build credibility and reach prospects.
Paying Offline with Mobile
I’ve just linked my American Express credit card with my iphone ‘Wallet’ creating a convenient way to pay for shopping without opening my real wallet. My prediction is that more banks will move to offering customers mobile payment convenience, leading to thoughts whether physical credit cards should still exist, or become obsolete.
Shopping on Social
There’s been a growing shopping trend: shopping directly within the social media platforms, with no need to follow a link to an online store. Facebook is already rolling out the option to buy products directly from its platform, and other social media platforms will follow its lead, especially visual platforms like Pinterest or Instagram. Other options to selling on social is via specific store platforms like Shopify and Ecwid. Social media as huge online sales platforms will become an everyday reality over the coming years.
SEO Will Focus More on Social Media
The trend is already here: people use social media for searching for products and services, and sourcing reviews and referrals about products and services. Traditional search engines are losing ground in favour of platforms like YouTube, Pinterest, Facebook, and Instagram. For this reason, search engine optimisation will focus more on social media content, with hashtags playing a greater role in keyword strategies. The whole concept of content creation for SEO purposes will adapt to the demands of social media platforms.
These are just six of the top social media trends I feel will dominate 2016. They are shaped by our changing lifestyle and digital evolution, by the way we choose to interact with each other and with businesses and, ultimately, in our attempts to make things simpler and more straightforward in an increasingly mobile and social world. What a very exciting time to be alive!
How to install Facebook Tracking Pixel on a WordPress Website
Facebook Ads are pretty powerful, and their even better when the targeting is right.
Have you ever gone to a website to research a product or service and then gone to your Facebook profile and that business’s ads follow you around?
That’s called re-marketing or re-targeting and how they do it is the website that you visited has some code installed that ‘tracks’ visitors (harmlessly) and then the business runs Facebook Ads specifically targeting anyone that been to their website. It’s powerful because the visitor to the website is already aware of the business, and marketing done properly can nurture the visitor back to the website for a second look or to buy.
Any business that has a Facebook Ads account can setup a similar re-marketing campaign by installing the Facebook Tracking Pixel or Custom Audience Pixel on their website. If you have a WordPress website, here are some simple instructions to get started.
Video walkthrough below >>>
1. Sign in to your WordPress dashboard
2. PLUGINS > ADD NEW > and search for Tracking Code Manager > INSTALL > ACTIVATE
3. Click SETTINGS > TRACKING CODE MANAGER >ADD NEW > insert a title for the tracking code you are about to create
4. Login to your Facebook Ads Manager > TOOLS > PIXELS > CREATE PIXEL > Copy the pixel code
5. Back to WordPress Tracking Code Manager and paste in the code > Select BEFORE /HEAD > SAVE
6. Click edit to edit the tracking code you just saved > click “In the whole website (pages, posts and archives)” > SAVE
7. Open CHROME browser > install extension FACEBOOK PIXEL HELPER
8. Open your website in Chrome and check that the Facebook Pixel Helper confirms the pixel is installed and working
9. Back to Facebook Ads Manager > TOOLS > PIXELS > CUSTOM AUDIENCE PIXEL > CREATE AUDIENCE > and set for a maximum of 180 days (This creates the custom audience you can target in your Facebook Ads.) (Once you have a few hundred, create a Lookalike audience to provide another target group for your future Facebook Ads).
10. Wait while Facebook gathers up your audience from visitors to your website, then create a Facebook Ad and select the website custom audience that you just created.
Let me know how you went installing the pixel and if you have any questions. Also give the guys that create the Tracking Code Manager plugin some kudos by upgrading to the paid version, so they can keep this wonderful plugin updated.
Here’s the video walk through for those how prefer to watch over my shoulder :)
Learn SEO the hard boring way or the fun easy way
If you have a business and it has any ‘assets’ online, like your website or social media profiles, you really need to know at least a minimum about SEO (search engine optimisation), it will be a game changer for attracting prospects to your business.
My friend and fellow Aussie, Kate Toon has a wonderful knack of teaching SEO that makes it fun and interesting, strategies and tactics you can use, even if your an absolute beginner. Kate has put together an ebook full of easy to digest and implement SEO tactics and best thing, it’s virtually free, it’s ‘pay by share’. I highly recommend you check it out.
Thanks to The Recipe for SEO Success for this awesome graphic
Share a post from your Page to your personal Profile Timeline
Due to recent Facebook Page changes, lately (August 2015) some people have had problems sharing posts they publish on their Facebook business Page on to their personal Facebook Profile timeline.
Here are some instructions that might help you, but let me know in the comments if you have a different problem with sharing from Facebook Page you admin to your personal Facebook Profile and I’ll see if I can’t sort it out for you.
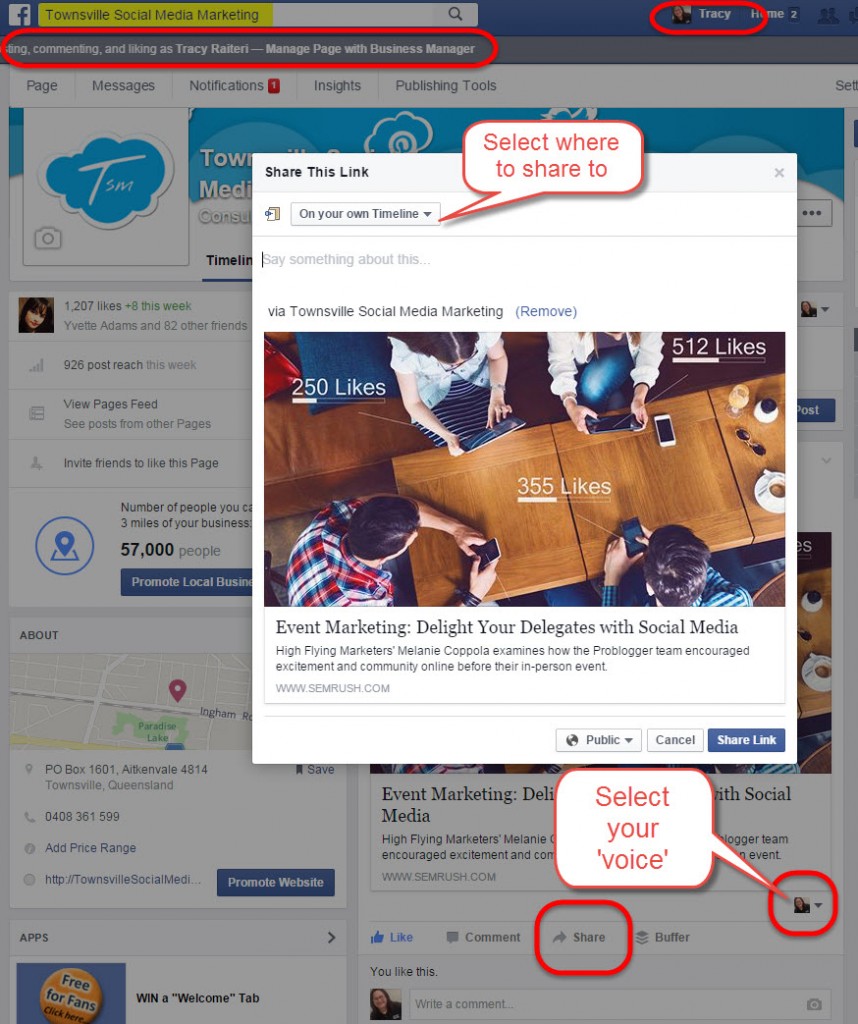
To SHARE a post from your PAGE to your Personal PROFILE as you personally:
- Sign in to your personal Facebook Profile
- type in your Page in the Facebook search box and open (you are now viewing your FB Page as you personally, you’ll see your FB profile image in the top right and in the comment box)
- now when you Like, Comment or Share you will be using your “personal” voice not the Page voice.
When you click share select “SHARE” to select WHERE to share to post to and to add a custom message.
Can’t add your Facebook Page as your Employer?
I often come across this problem when trying to setup clients so that their place of employment links to their Facebook Page, but for some reason Facebook doesn’t include their new page in the dropdown. Well, here’s the fix:
Step 1.
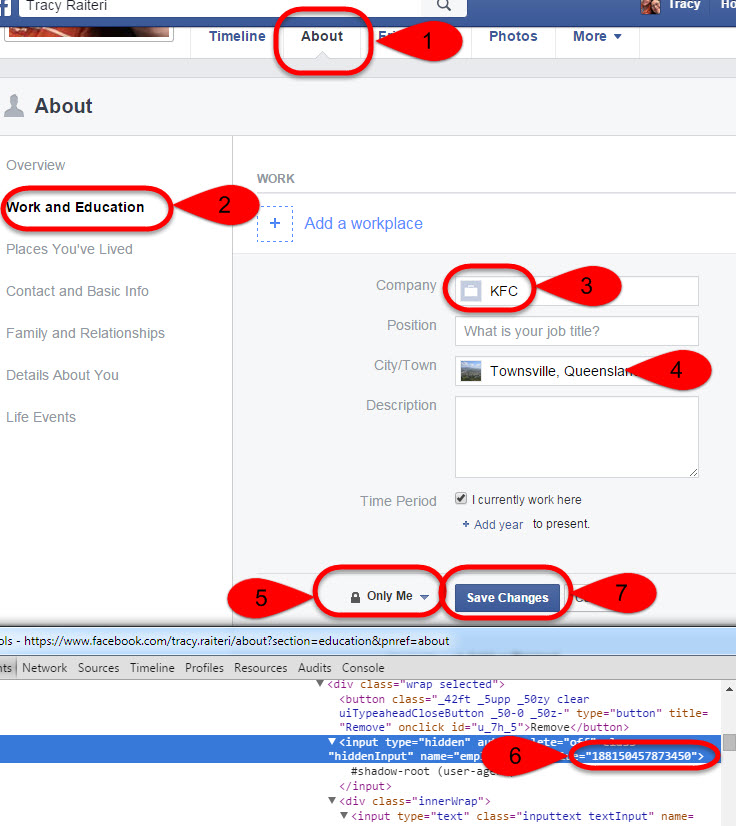
First you’ll need your business Facebook Page ID number – Go to your Facebook Page > About > Page Info > and scroll right down the bottom – copy this number.
Step 2.
Then go to your personal Facebook Profile > About > Work and Education > Add a Workplace > select any company at all to start with, make sure you add a CITY/TOWN, select ONLY ME to see the change, then click save. Don’t worry, we are going to change the COMPANY in the next step, this is just to set it up.
Step 3.
Next click EDIT and make sure your cursor is in the Company text box and right mouse click “Inspect Element” and you’ll notice a screen showing code. Now find a line of code that says “name=”employer_id” value=”111111111111″ (this number changes depending on the FB Page you selected originally.) Paste in there the Page ID from your Facebook Page, change privacy setting from Only Me to Public and click SAVE CHANGES on the Facebook form.
You should now have a link from your Work and Education directly to your Facebook Page.
Let me know how you get on with this.
Coming Soon… Advertising on Instagram
Facebook announced that they are rolling out the ability to advertise on Instagram.
Why is this a good thing for businesses?
Instagram is one of the most engaging social media platforms, and until now it was tough for businesses to get actual measurable conversions from Instagram organic posts. Businesses could only include a link to their website in their Instagram profile, meaning that prospects would need to view the businesses profile to then be driven to the businesses website.
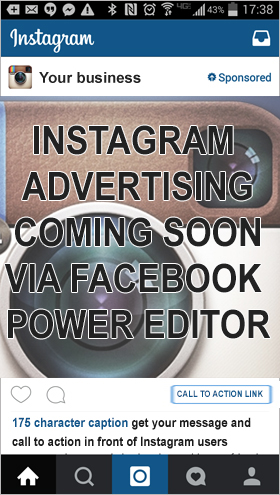 Things will change with Instagram ads. From the information Facebook have published, there will be the ability to add a ‘call to action’ as well as a link to a website directly within people’s stream.
Getting ready to run Instagram Ads:
The ability to run Instagram Ads will be rolled out to businesses, but you can get ready by ‘claiming’ your Instagram profile in your Facebook Business Manager, then sit and wait, patiently.
What you’ll need:
- An Instagram profile ‘claimed’ by Facebook Business Manager
- At least one Facebook Ads Account with a current payment method, assigned to the Instagram profile
- Facebook Power Editor with access to the assigned Facebook Ads Account
Instagram Ad details:
- Image Size: Square ideally 640px x 640px
- Text on image: 20% rule applies eg not more than 5 cells in a 25 cell grid to contain any part of text.
- Caption: 175 characters
Your Instagram ad will appear in people’s Instagram feeds along with images shared by their friends, family and other Instagram accounts they follow.
Ad Display Layout:
Top-left will be your Instagram handle click through to your Instagram profile.
Top-right will be a Sponsored icon.
Bottom-right will be a call-to-action button you chose when creating the ad that will go to a website URL you specified.
Directly below the image will be the text caption you included with your ad.
More information about Instagram Advertising – https://www.facebook.com/business/help/107525429594443/
We’d love to know what you think… Do you think advertising on Instagram will be beneficial to your business?
How to schedule your Instagram Posts using Crowdfire
It’s pretty unanimous, images are one of the most effective mediums in social, they catch prospects attention and they foster more engagement and shares. Instagram, an image sharing social community platform, is one of the most effective ways of getting your images out in-front of prospects.
BUT… Instagram is time consuming if you what to post consistently. Solution is Crowdfire app and here’s how to set it up:
Easy Steps to Setup Scheduling for Instagram
Pre-reqs: You need your Instagram account login and password and Twitter profile login and password.
Steps:
1. Install the Instagram app on your mobile (if you haven’t already) and login to Instagram with your Instagram account
2. Install the Twitter app on your mobile (if you haven’t already) and login to your Twitter account
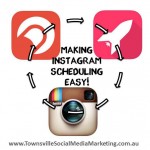
3. Search the app store and install the Crowdfire app. Note: the Crowdfire app will install two apps:
 Crowdfire ‘growth’ app |  Publish ‘scheduler’ app |
4. Open Crowdfire ‘thumbnail’ icon on your phone and use your Instagram login to signin
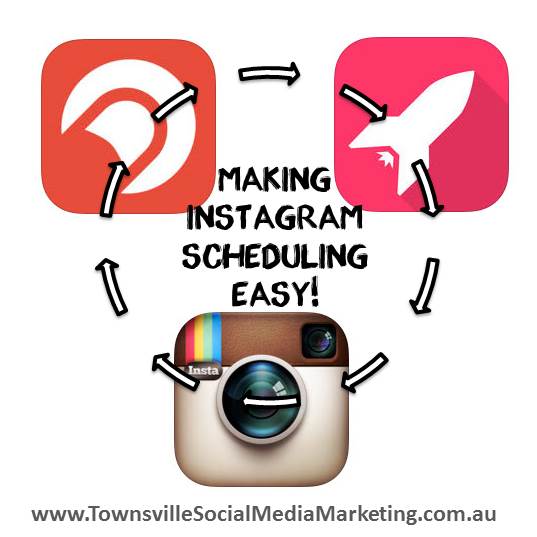
5. This will create two new icons on your phone, the rocket “Publish” is the app that will facilitate your Instagram scheduled posts and the thumbnail “Growth” platform which is a great tool to build your community on Instagram and Twitter.
6. Click on the rocket icon to view, edit, delete or publish scheduled Instagram posts.
Crowdfire lets you plan and schedule posts to Instagram, but it will not actually publish the post, you need to do that manually. You will receive a mobile notification when it’s time to ‘publish’ a scheduled Instagram post. When you get the notification, click on the message and it will open in the publish app, click the post icon to POST and it will ask you to select your INSTAGRAM account, click and it will open the scheduled post inside Instagram ready for you to publish like you would any other normal Instagram post. You will have the option to share the post also on Twitter and Facebook and other social platforms if you have them set up.
For more information:
https://itunes.apple.com/in/app/justunfollow/id528626975?mt=8
https://itunes.apple.com/in/app/publish-on-twitter-instagram/id927931359?mt=8
https://www.crowdfireapp.com/help.html
To setup a link between Instagram and your Facebook Page and your Twitter profile so you can share. Inside Instagram, click on the gear icon in the top right, scroll down and click on “LINKED ACCOUNTS” and select the accounts you want linked to your Instagram. NOTE: you need to have the Facebook App and the Facebook Pages App and the Twitter App signed before you can link the accounts to Instagram.
For more information:
https://help.instagram.com/356902681064399
Setting up Facebook Authorship on WordPress
Google might have removed ‘Authorship’ tagging showing in search, but Facebook has embraced it and it’s a great way to build your reputation as an authority in your niche. Facebook Authorship will display a link to your personal Facebook Profile directly inside the link previous in posts.
This is a tutorial on how to install it on your WordPress website.
Requirements for this tutorial:
1. Self-hosted WordPress website;
2. Installed plugin “WordPress SEO by Yoast“;
3. A Facebook Profile.
STEPS
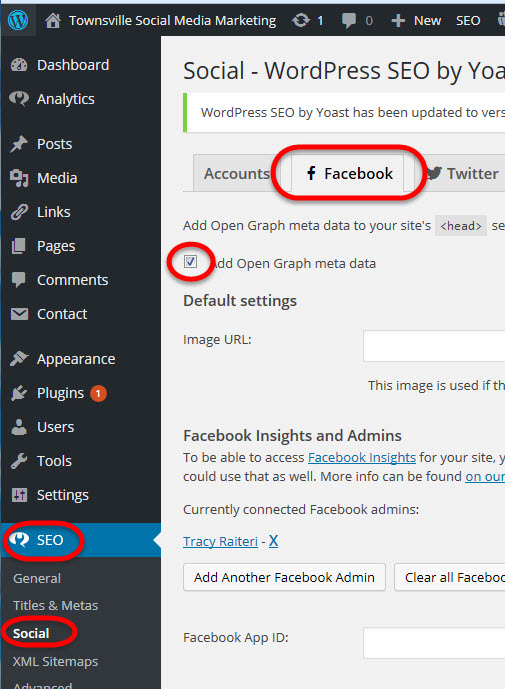
Step 1: Go to WordPress SEO by Yoast settings > Social > Facebook > tick “Add open graph meta data” > Save
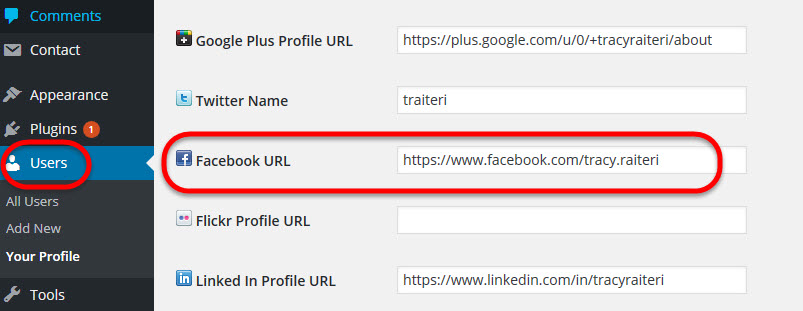
Step 2: Go to WordPress USERS > edit the User > insert URL of personal Facebook profile > Update Profile
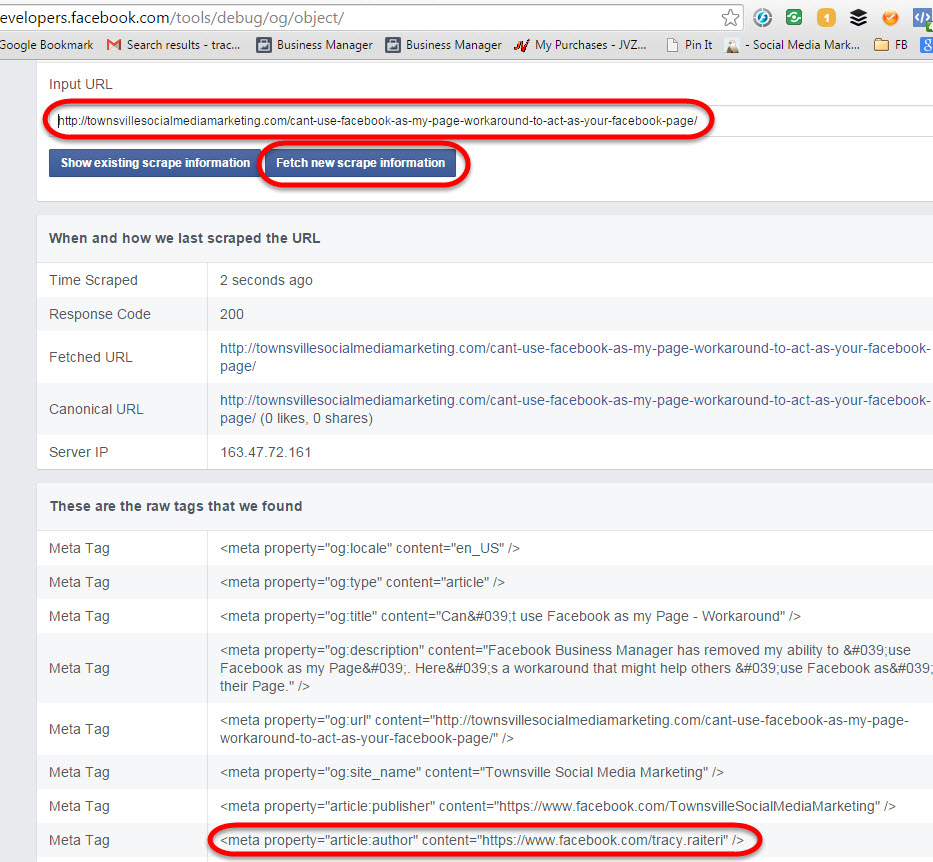
Step 3: Go to Facebook Debug site > paste in the URL of the post that you want to share on Facebook > Click Debug > Click Fetch new scrape information (You might need to do this for each post URL if Facebook doesn’t pull the right information over.)
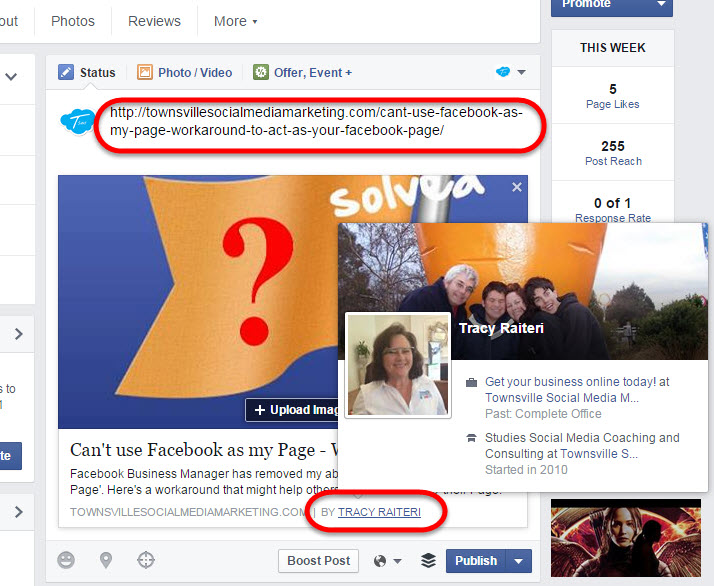
Step 4: Now when you post a link to your post from your blog your WordPress website it will include a “By <link to your personal profile>” where readers of the post will be able to connect with you or FOLLOW you on Facebook.
Can’t use Facebook as my Page – Workaround to act as your Facebook Page
 About a month ago (April 2015) I lost the ability to ‘use Facebook as my Page‘ now I only see ‘Your Page’ when I click on the dropdown. As social media managers we need to conduct moderation, monitoring and outreach for our business Page clients, so I needed a workaround for viewing the Page’s newsfeed, liking other pages as the Page and commenting and sharing as my Page.
I have a feeling Facebook are moving us all towards a one ‘sign-in’ which will be your personal Facebook Profile, and then you’ll need to switch on the fly between ‘voices’. Maybe they are doing this to try and eliminate all those fake accounts people and businesses have created to manage Facebook Pages, now you really can only sign-in as you personally on Facebook, but switch on the fly between pages you admin.
Here’s what I found (video walk-through at the end of this post).
Can’t view your Facebook Page’s News Feed any more?
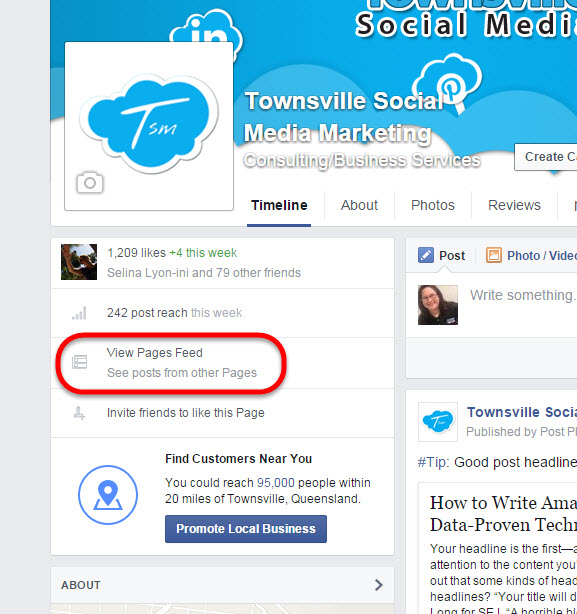
To view Page news feed, view the Timeline and then click on “VIEW PAGES FEED” in the left nav area
Can’t post, like or comment as my Facebook Page?
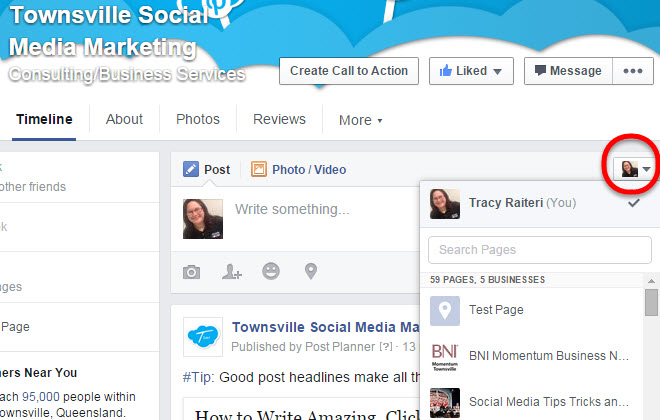
To change ‘voice’ and post or comment as page, use the ‘voice’ selector – (little grey flag or profile icon) at the top right of posts/status updates and select the Page you want to engage as.
Can’t Share someone else’s post on my Page’s Timeline as my Facebook Page?
When you want to SHARE a post either from another Page or from your own news feed, you will need to:
Step 1. Click on SHARE then select “Share…” don’t click on “SHARE NOW” as this will share the post to your personal Facebook Profile not on your Page.
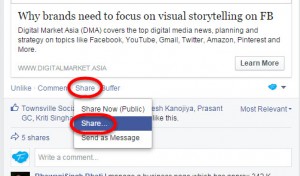
Step2. Then in the next screen click on the dropdown and select “On a Page you manage”, then select the Facebook Page that you’d like to share this post to, making sure the “Posting as” shows your Page as well.
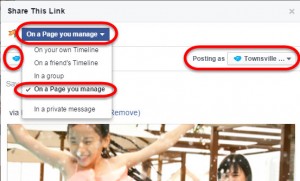
Customise the message and click “Share”
Can’t LIKE another Facebook Page as my Page?
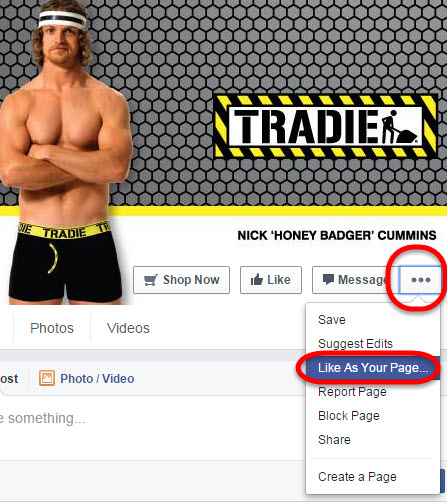
To like a Page as your Page, view the other Page’s Timeline and click on the ‘…’ and select ‘like as your page’ and select the page you would like to LIKE the other Page as. (Don’t hate me for liking this page :) )
Can’t UNLIKE a Facebook Page that my Page has liked?
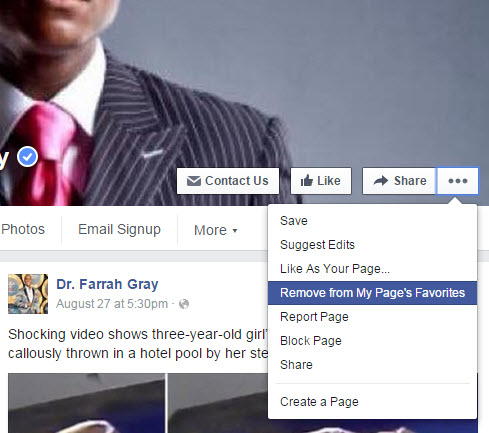
To unlike a Page to stop that Page’s posts displaying in your Page’s news feed, got and view the timeline of the Page you want to unlike and click on the ‘…’ and select “Remove from My Page’s Favorites”.
Video Walk-through
Facebook Business Manager: How to Change the Primary Page
If you signed up for Facebook Business Manager, you’ll probably be regretting it :) but I’m sure Facebook will iron out the kinks soon.
In the meantime, the biggest problem I have with it is that you can no longer “POST AS” your main Facebook Page if you have it assigned as the primary Page in Facebook Business Manager. Here is a workaround:
PROBLEM: When you assign a primary account in Facebook Business Manager you can’t “POST AS” that page any more using your Personal Facebook Profile – which is a pain if you like to share content from your personal newsfeed into your Page as “YOUR PAGE” that that PAGE is the PRIMARY page in your Facebook Business Manager.
SOLUTION: Assign a new PAGE as the PRIMARY page in your Facebook Business Manager and REMOVE your business page from Facebook Business Manager so you can now access it through your Facebook personal Profile.
Video Tutorial at the bottom of this article.
Sign in to Business Manager;
CREATE NEW PAGE
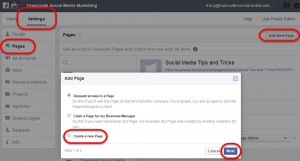
Click on SETTINGS > PAGES > ADD NEW PAGE > CREATE A NEW PAGE > NEXT;
Follow the prompts to create your new PRIMARY Page for Facebook Business Manager;
ASSIGN NEW PAGE AS PRIMARY PAGE
Next, click on SETTINGS > INFO and click the pencil icon to edit the PRIMARY PAGE;
Click SAVE.
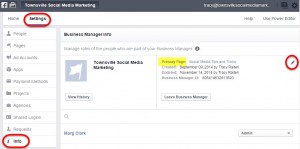
REMOVE BUSINESS PAGE FROM FACEBOOK BUSINESS MANAGER
Because the old Primary Page will have the FBM account as the owner, you need to remove it so that it opens it up to “POST AS” that Page in your Facebook personal Profile.
Next, click on SETTINGS > PAGES > click on the page you want to remove > REMOVE;
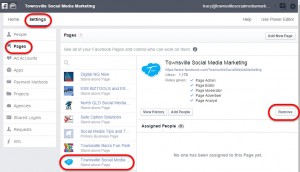
Optional Step – add the old Primary Page back to Facebook Business Manager as a “Stand Alone Page” which means it’s not ‘owned’ by the Facebook Business Manager account, and you’ll still be able to login as the Page through your Personal Facebook Profile.
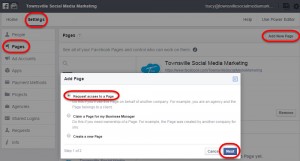
ADD FACEBOOK PAGE TO BUSINESS MANAGER AS STAND ALONE PAGE
Click on SETTINGS > PAGES > ADD NEW PAGE > REQUEST ACCESS TO A PAGE – and follow the prompts.
This added page will be “STAND ALONE” and will still be accessible through your Personal Facebook Profile.
Video Walk-though:


